COMP 4900 Academic and Professional Development
Training Module: Git & GitHub
Objectives and Intended Learning Outcomes
The objective of this training module is to enhance your understanding of Git and version control. After completing this module, you should be able to:
- Perform basic Git operations: Execute fundamental commands to manage your code repository effectively.
- Apply version control principles: Utilize version control techniques to track changes in your projects and collaborate with others.
- Build a strong foundation for advanced courses: Develop essential version control skills that will prepare you for more advanced topics.
- Explore GitHub features: Leverage GitHub’s capabilities to enhance your coding workflow and project management.

Introduction
In this module, we will explore Git and GitHub, two essential tools in modern software engineering. Understanding these tools is crucial for effective version control and collaboration in software development.
Before we delve deeper into Git and GitHub, it's important to understand what version control is.
What is Version Control?
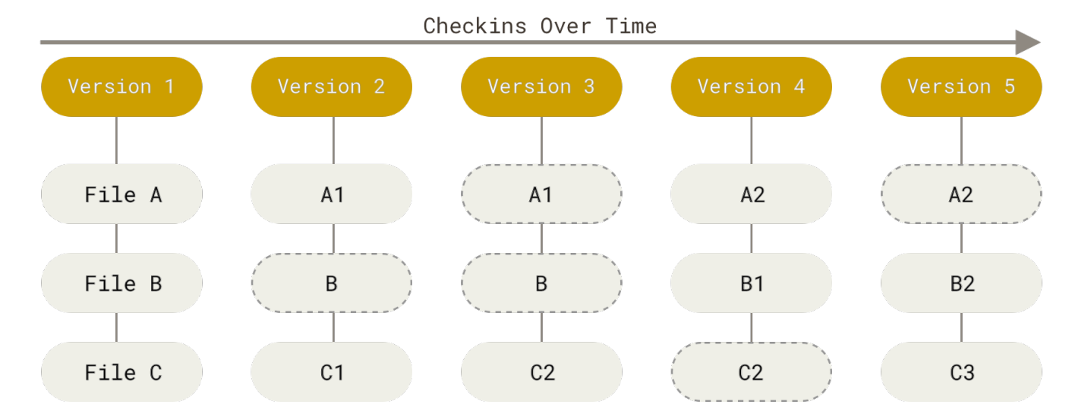
Version control is a system that tracks changes to files over time, allowing you to retrieve specific versions at a later date. A Version Control System (VCS) enables you to:
- Restore a specific file to a previous state
- Roll back the entire project to a previous state
- Track changes over time
- Identify who last modified the files
Types of VCS
Common version control models include Local VCS, Centralized VCS, and Distributed VCS. Modern software teams typically use distributed systems such as Git.
What is Git?
Git is a distributed version control system that helps track changes in your code over time.
Think of the changes as a stream of snapshots, each representing the state of your project
at a specific point.
A Git repository contains a hidden .git folder within the project directory,
which stores all the version history and metadata.
What is GitHub?
GitHub is a website and cloud-based service designed to help you save and manage your code and projects. It is the most commonly used platform for hosting repositories, allowing you to share your code online with others. Additionally, GitHub can serve as a valuable tool for showcasing your work, acting as a developer's resume.

With this foundation, in this module, you will learn a complete workflow: setting up Git, creating and cloning repositories, making meaningful commits, working with branches, resolving basic merge conflicts (self-learn), and collaborating using pull requests.
By mastering Git and GitHub, you will enhance your ability to manage projects effectively and collaborate with others in the software development process.
Installation
In this workshop, we will use Git and Visual Studio Code (VSCode) to complete our practice.
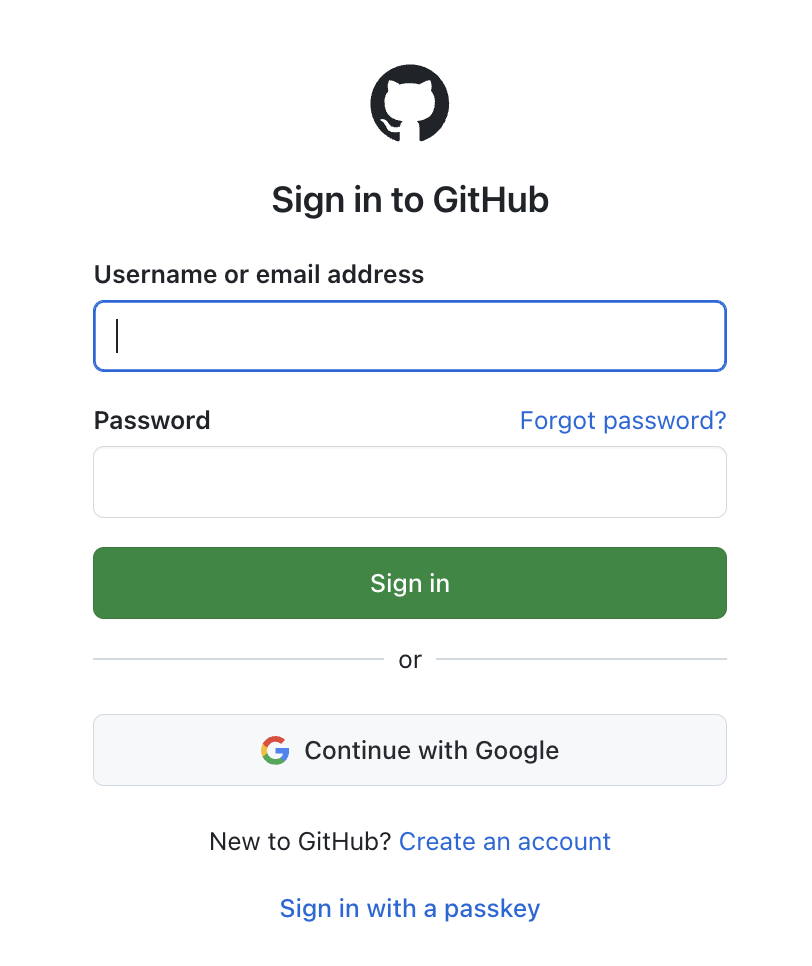
1. Create a GitHub account
Visit github.com and sign up for a free account.
2. Install Git
Git is the command-line tool that powers GitHub. To install it on your system:
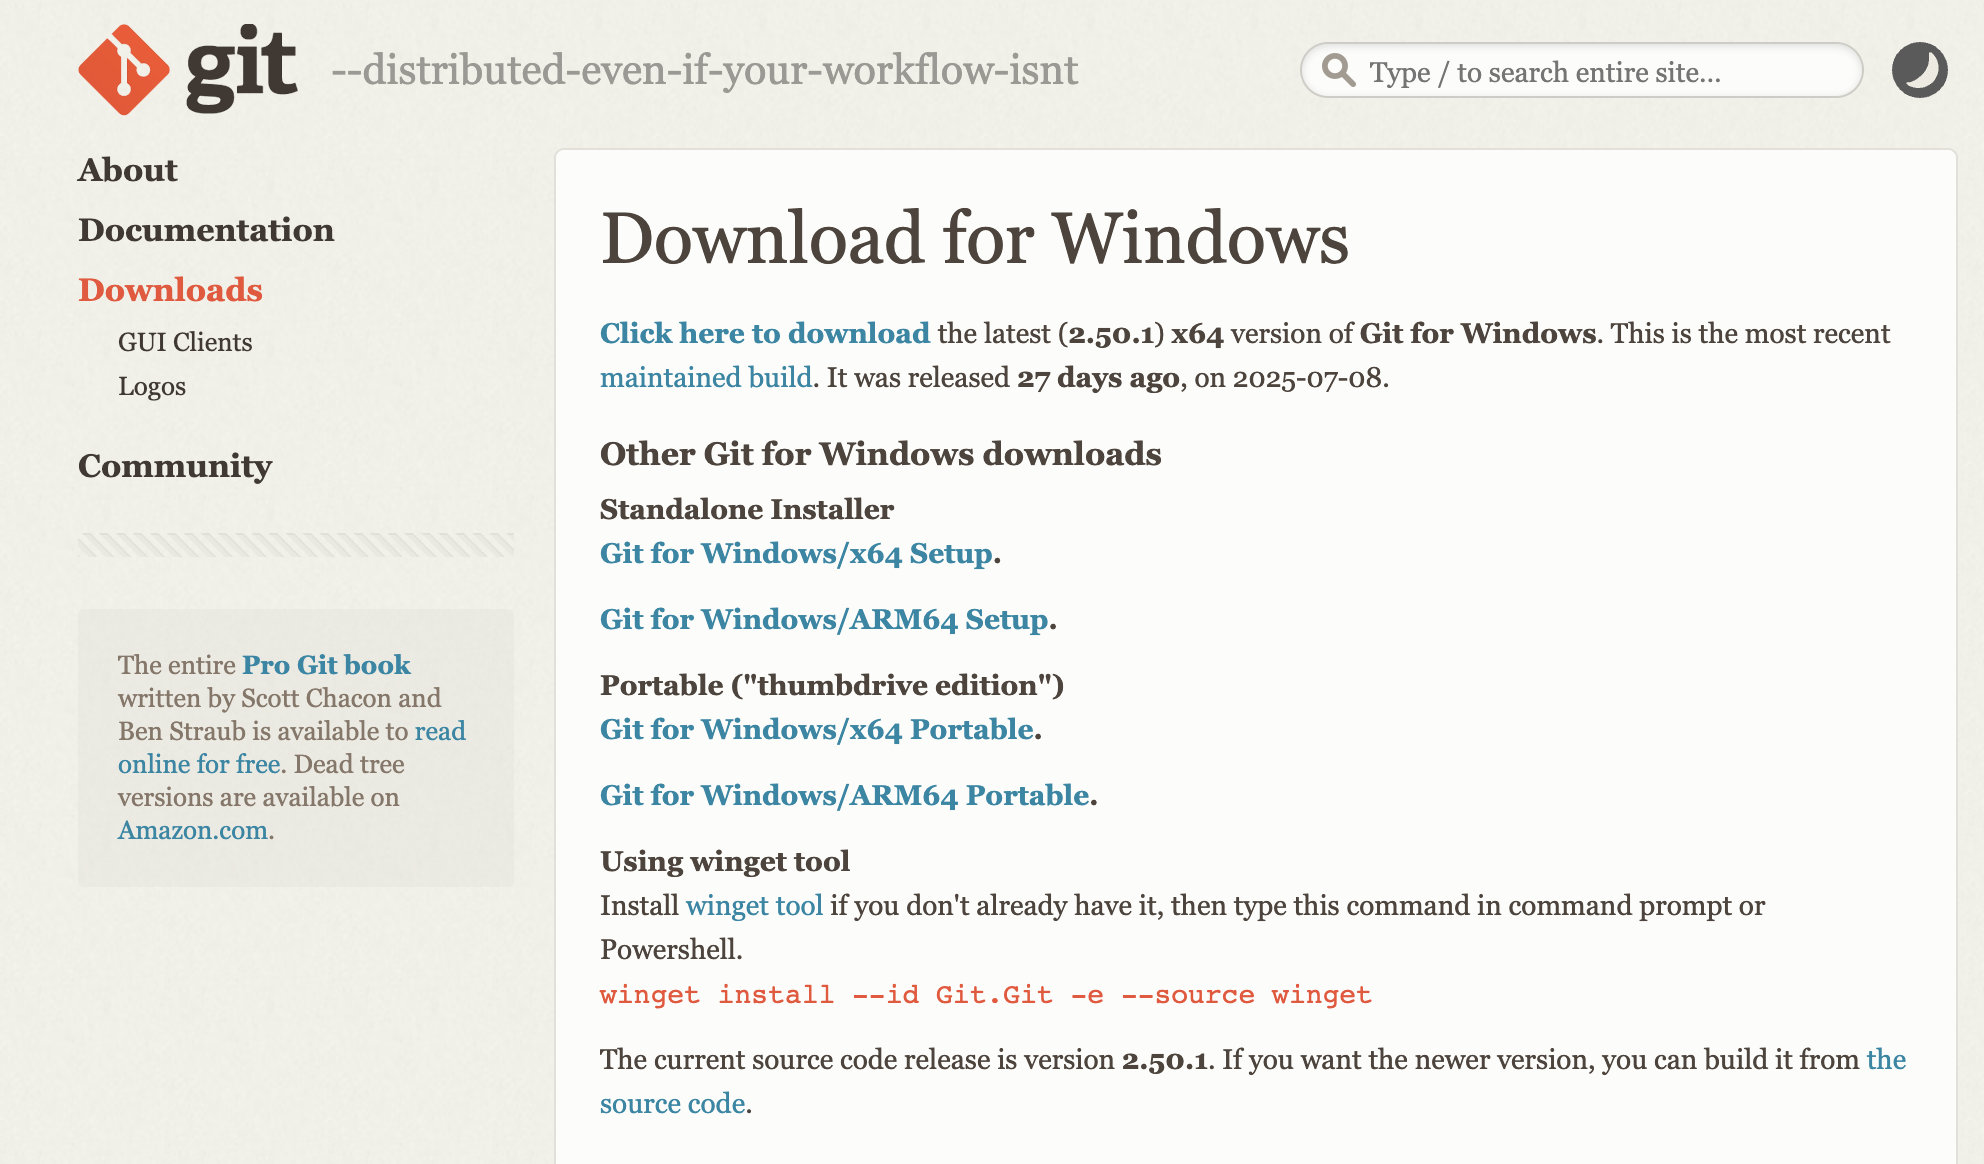
For Windows:
- Download the installer from git-scm.com
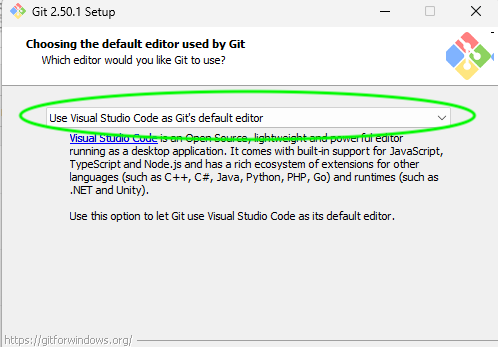
- Open the downloaded
.exefile and click Next until you reach the page where you can choose the default editor. - Select Use Visual Studio Code as Git's default editor, then continue clicking Next until the installation is complete.
For macOS:
- If you haven't already, install Homebrew. In your terminal, run:
- After Homebrew is installed, use it to install Git by running:
/bin/bash -c "$(curl -fsSL https://raw.githubusercontent.com/Homebrew/install/HEAD/install.sh)"brew install git3. Configure Git
Open VSCode and launch the terminal by pressing Ctrl + ` (or use the macOS
terminal directly).
Set up your identity in Git by entering the following commands:
git config --global user.name "Your Name"
git config --global user.email "your.email@example.com"4. SSH Setup
In VSCode, open the terminal using Ctrl + ` and type:
ssh-keygen -t ed25519 -C "your_email@example.com"Press "Enter" repeatedly until you see a confirmation message. This will create the SSH key in the default directory for later use.
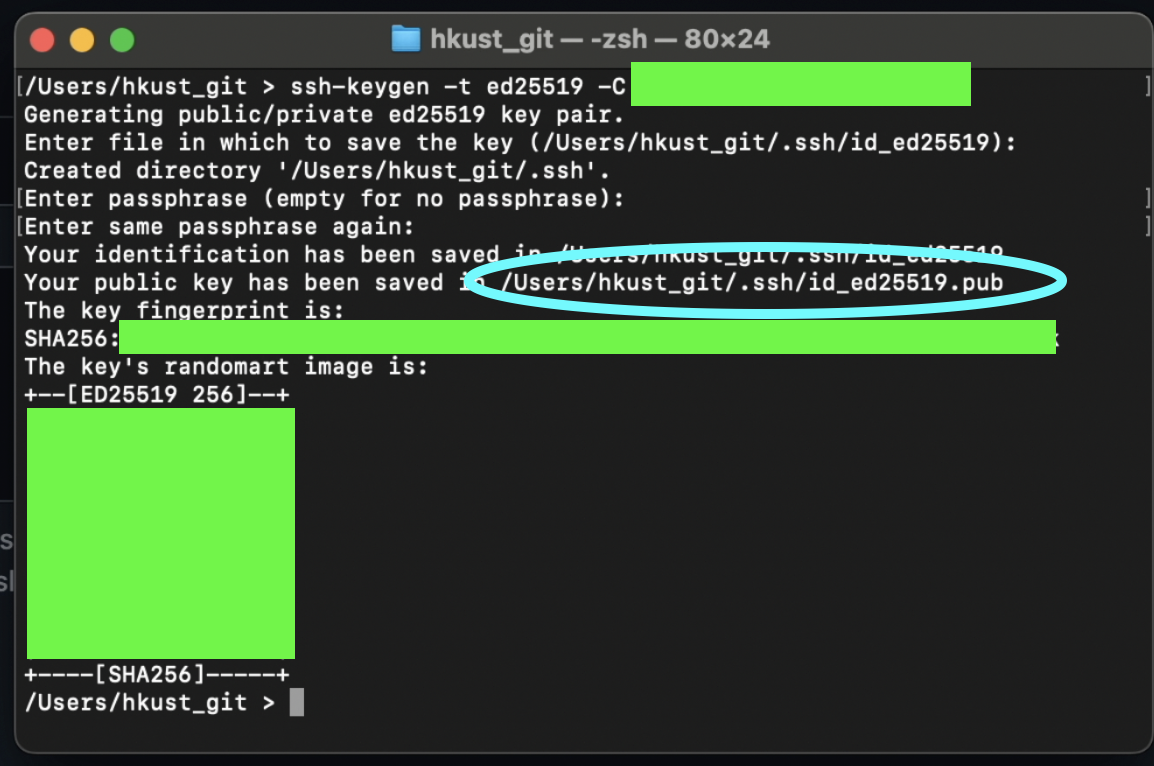
Next, retrieve the SSH key by typing:
cat ~/.ssh/id_ed25519.pub
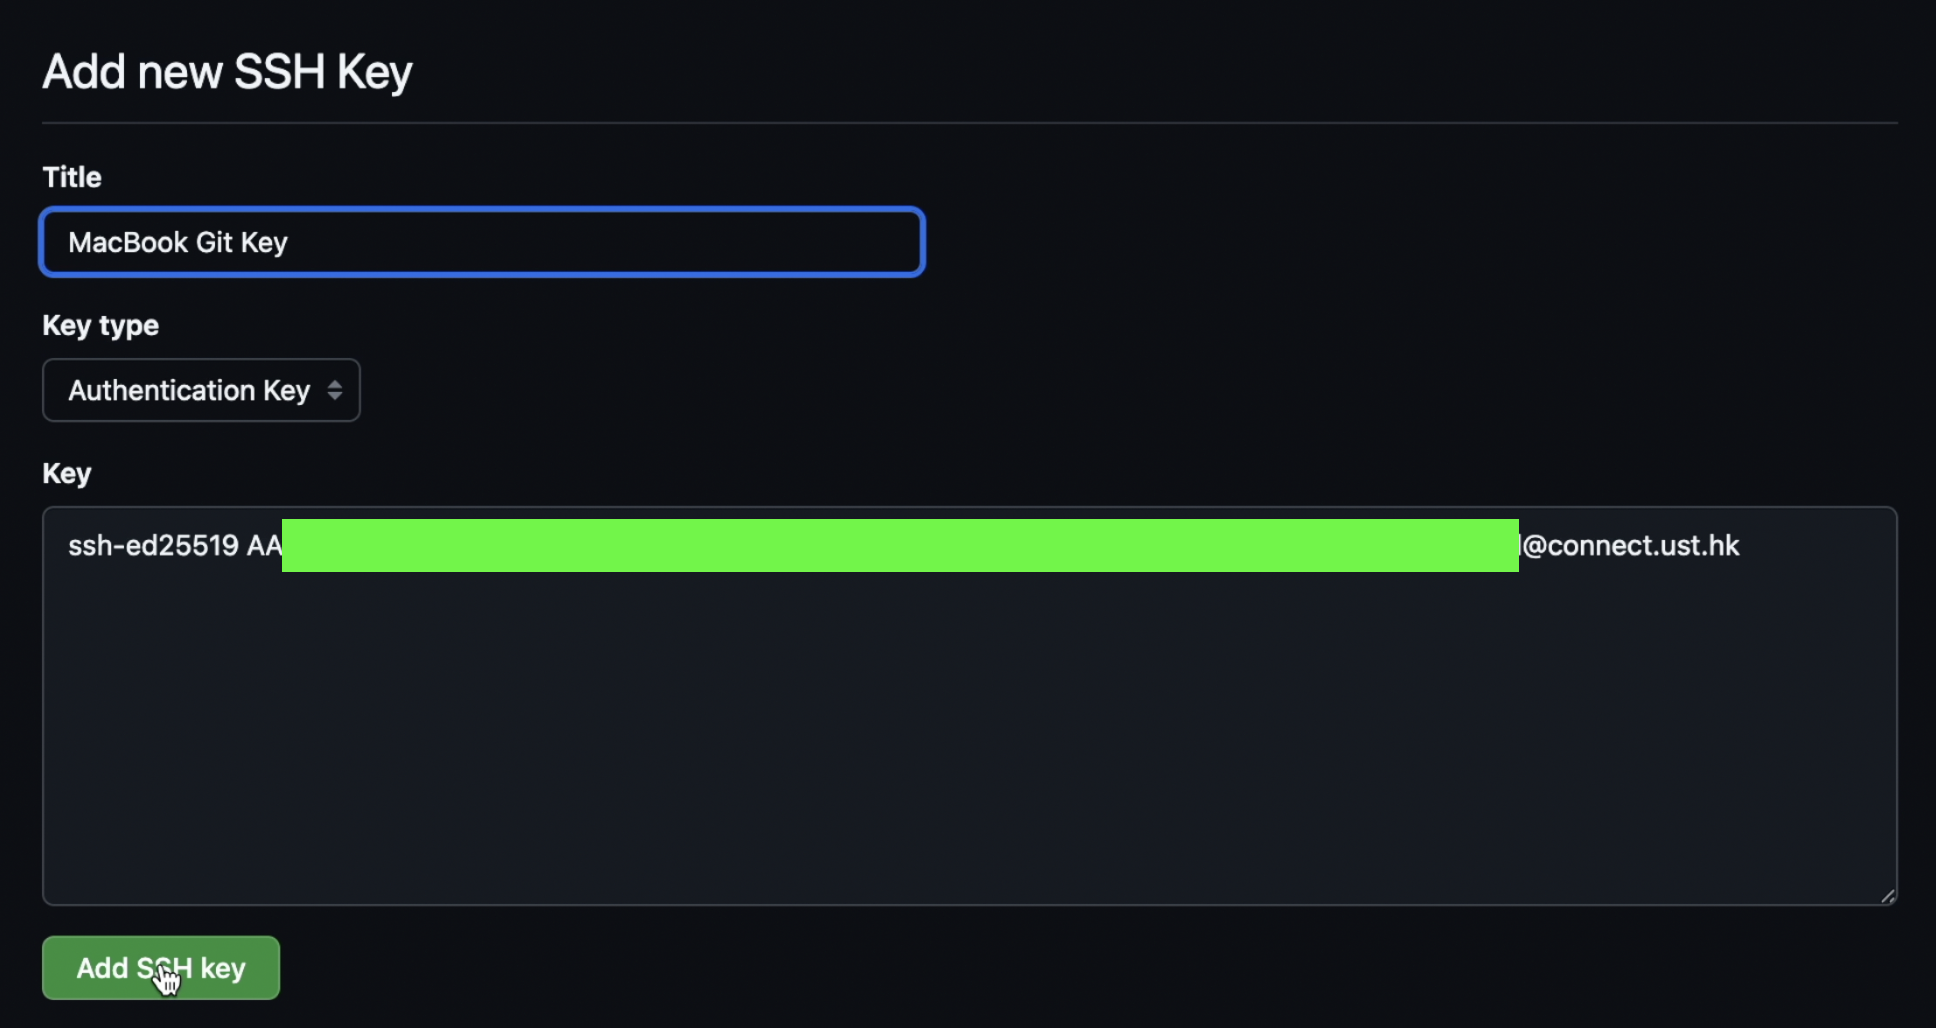
Copy the displayed key and add it as a new SSH key in your GitHub account.
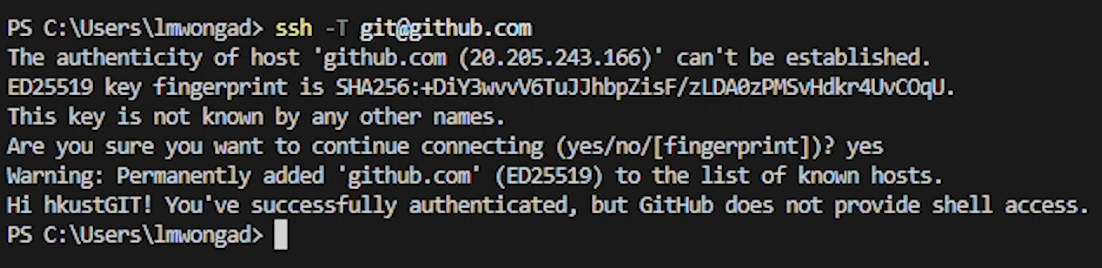
To test your setup, run the following command in the terminal:
ssh -T git@github.comWhen prompted, type "yes" to confirm the connection. If the setup is successful, you will see a success message.
Basic Commands
Practice the essential daily Git command workflow.
Getting a Local Repository
As mentioned earlier, a Git project contains a hidden .git folder.
If you want to make your folder a Git project, initialize a repository from the project root.
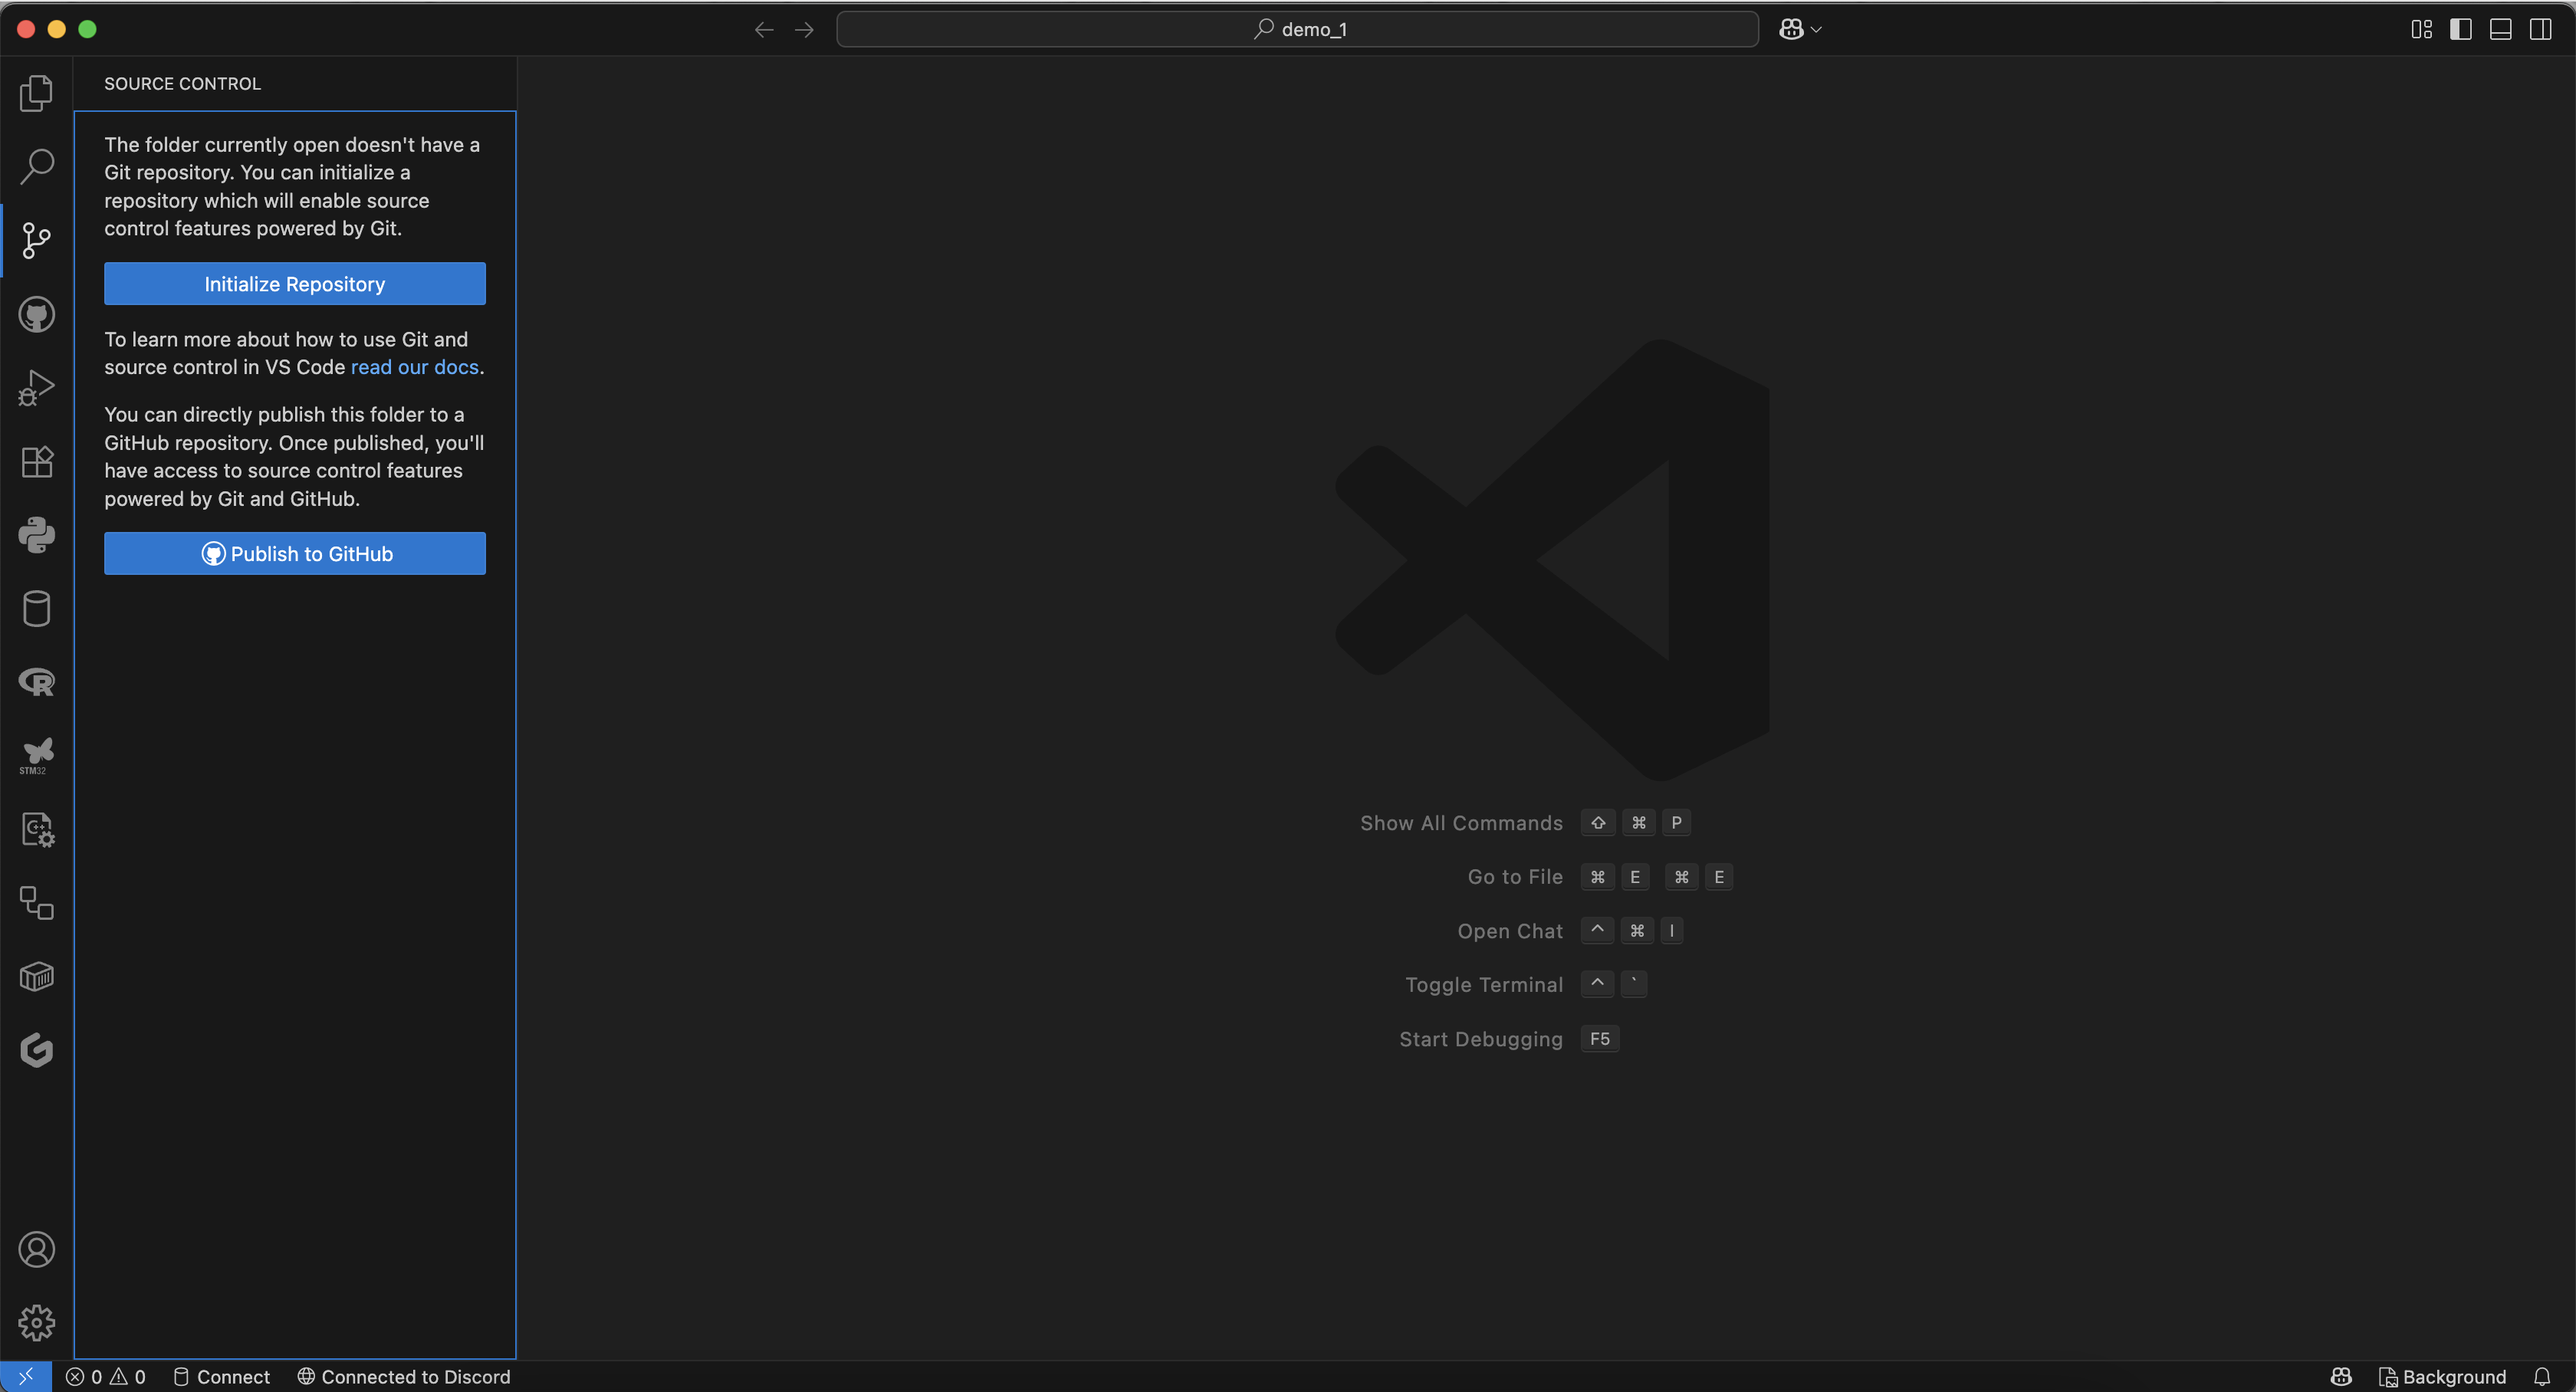
Using terminal
Open terminal in VSCode and run:
git initBasic Workflow of a Git Project
The Basic Workflow of a Git Project has three local stages: Modified, Staged, and Committed.
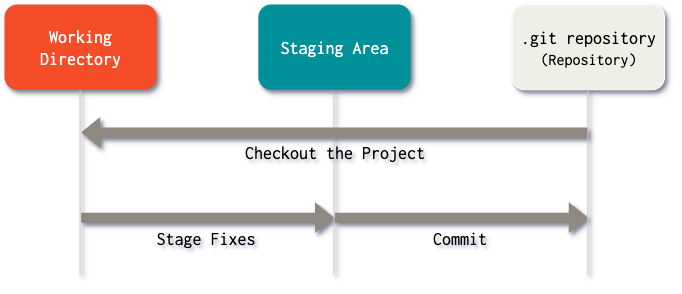
- Modified: Files that you have changed in your working directory, but have not yet staged for commit. These changes exist only on your local machine and are not part of any commit yet.
- Staged: Files that you have marked to be included in the next commit. Using
git add, you prepare your changes to be committed. This is the "staging area" or "index" where you curate which changes you want to commit. - Committed: Changes that have been permanently saved in the Git repository history. Once
committed with
git commit -m "message", your changes create a snapshot in the project's version history that can be retrieved at any time.
Stage and Unstage Files
Example: create a hello_world.py file, then add it to staging.
print("Hello world")hello_world.py
Using VSCode
Click the + icon in Source Control to stage changes.
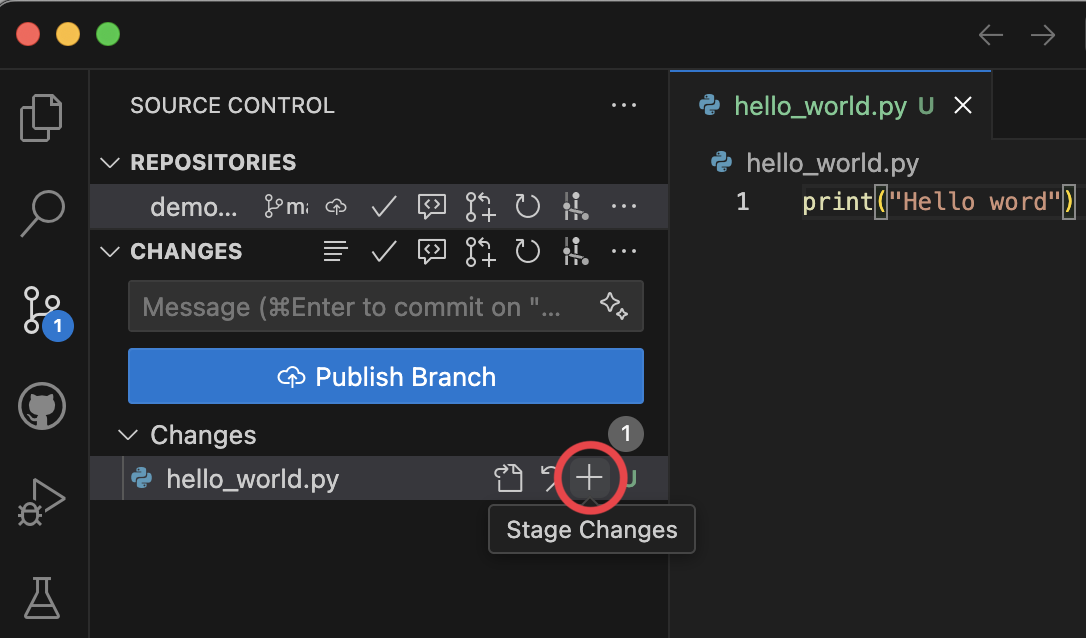
+ button
Using terminal
# Replace hello_world.py with your target file
git add hello_world.py

# Or stage all files
git add .

# Remove from staging area
git reset hello_world.py
Removing from Staging Area (VSCode)
Click the - icon to unstage a file.
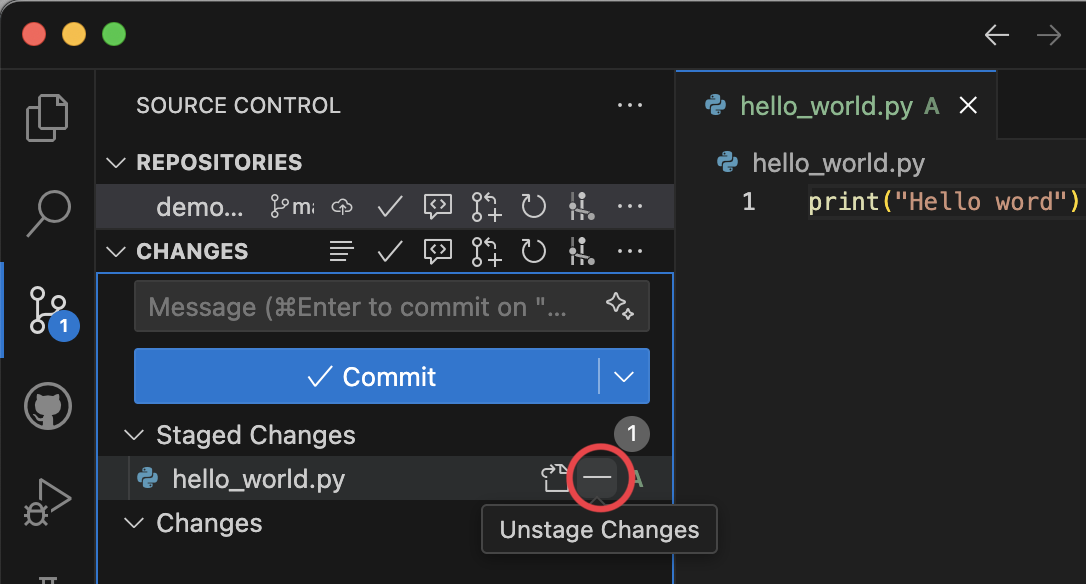
- button
Using terminal
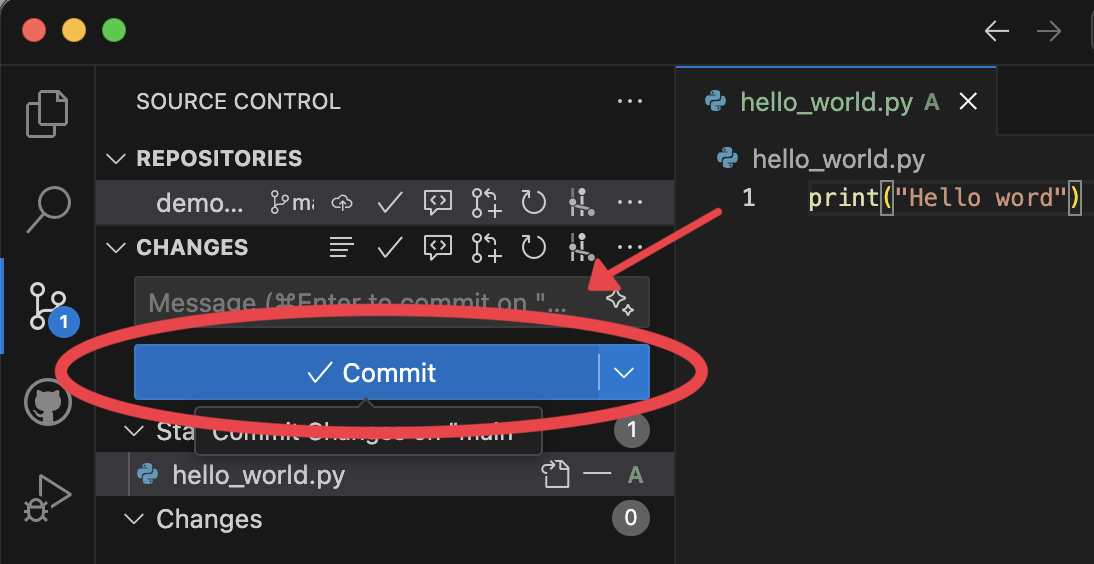
git reset hello_world.pyCommit a file from staging area to repository
After staging files, write a commit message and save the snapshot to local repository.
Using terminal
# Check what changed
git status

# Save a snapshot
git commit -m "commit message"
If you want to learn how to safely undo a commit after it is pushed, you can learn from here.
Viewing Commit History
You can view the commit history using VSCode or the terminal.
Using VSCode
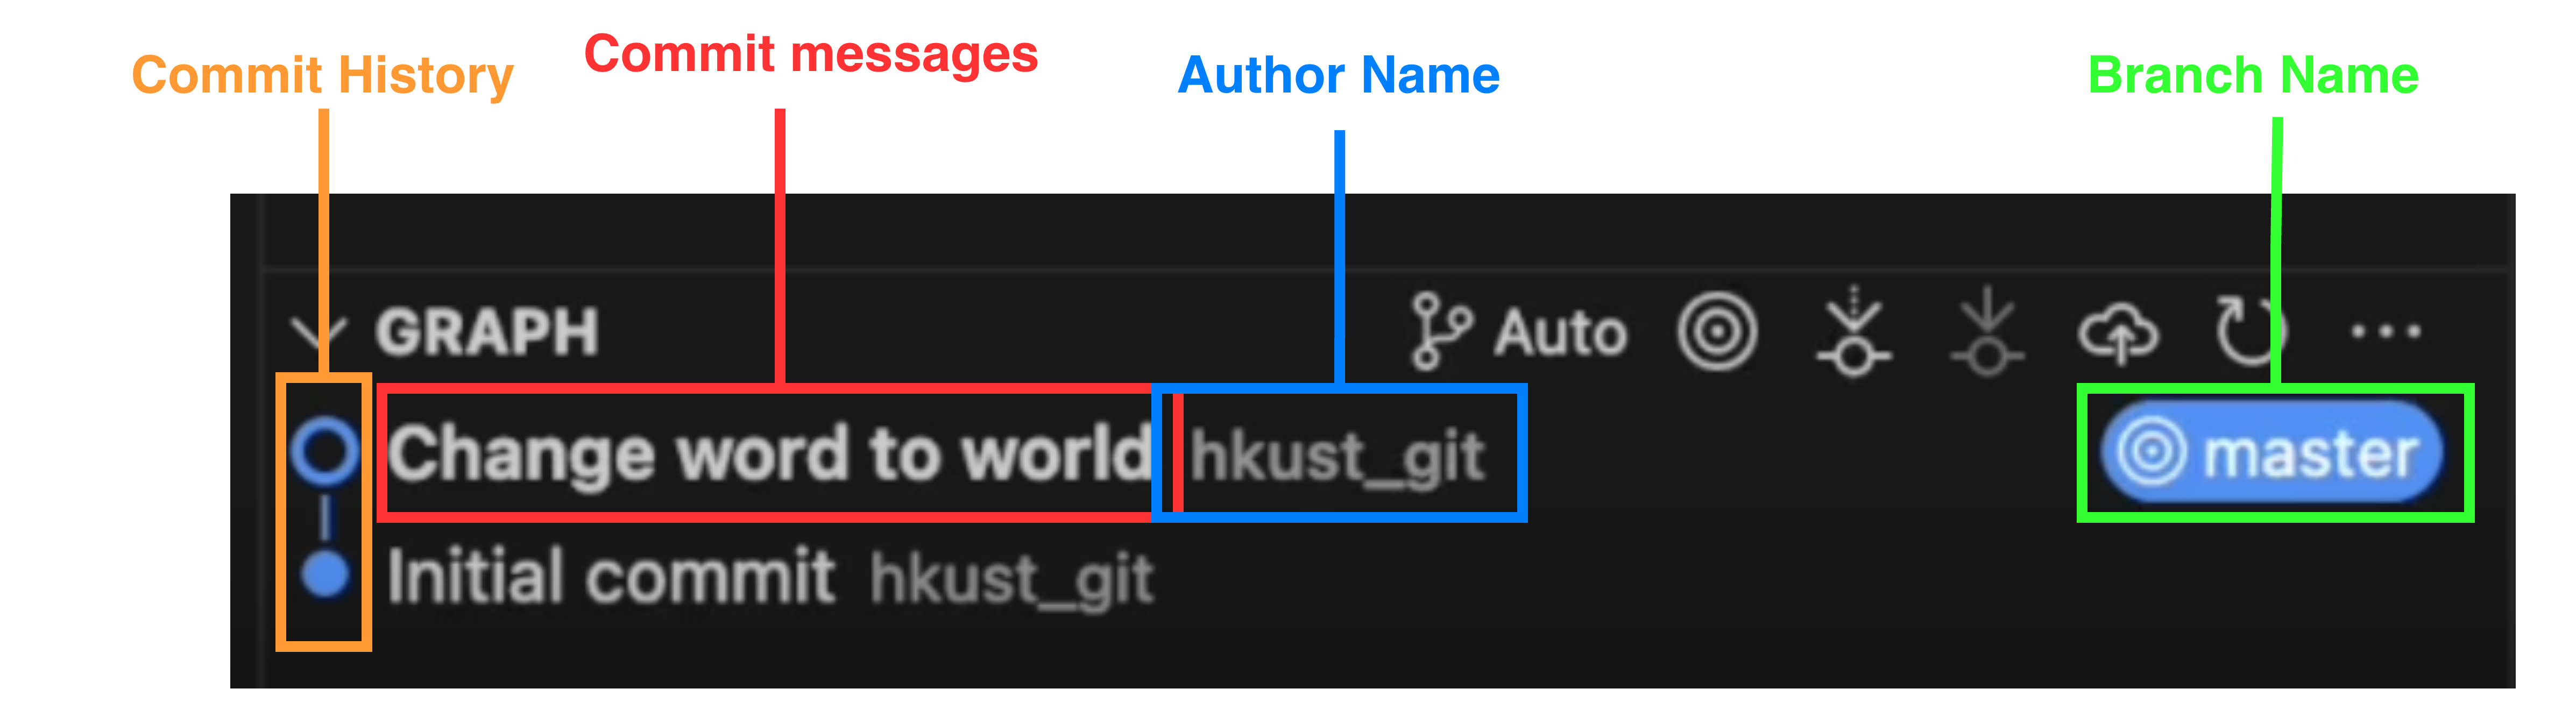
Click on the Source Control icon in the left sidebar and look for the GRAPH section. This displays a visual timeline of all your commits with branches, showing:
- Commit messages
- Branch names (shown in blue labels like "master")
- Commit history timeline flowing downward
- Author information by hovering over commits
Using Terminal
Use the git log command to view commit history:
# View commit history with details
git log

# View commit history in one-line format (compact)
git log --oneline

# View commit history with author and date
git log --oneline --graph --all --decorate
Commit Object (Concept)
A commit object stores a pointer to the snapshot, a pointer to the previous commit, author information, and commit message. For example, we make one more commit:
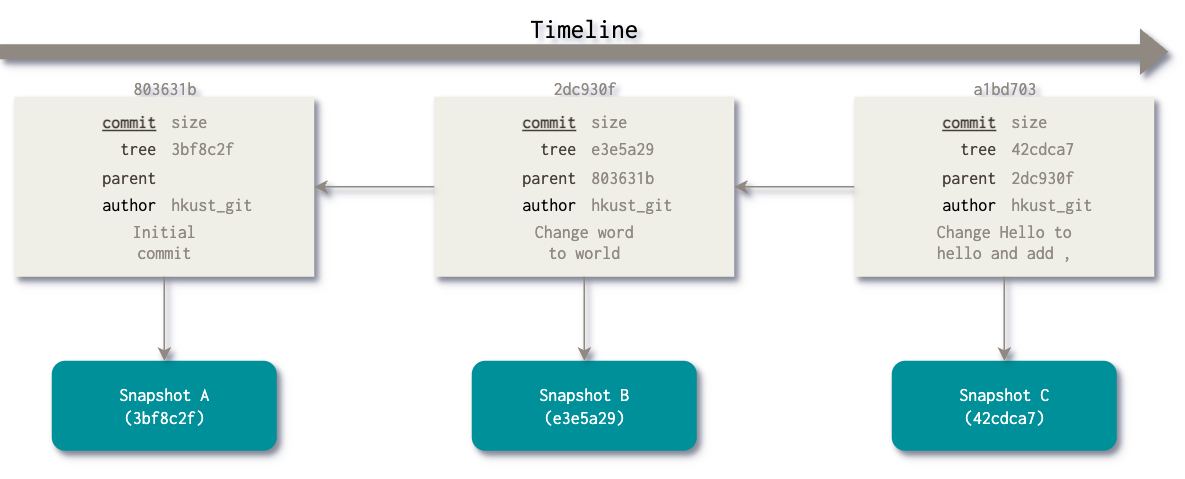
The snapshot stores the data state at that commit.
Important
Always write clear, descriptive commit messages. Future you and your collaborators will thank you.
Branching
Sometimes we need to make changes without editing the main line directly. Branches let you work safely without copying the whole repository.
A branch is a pointer to a commit. HEAD tells you which branch you are currently on.
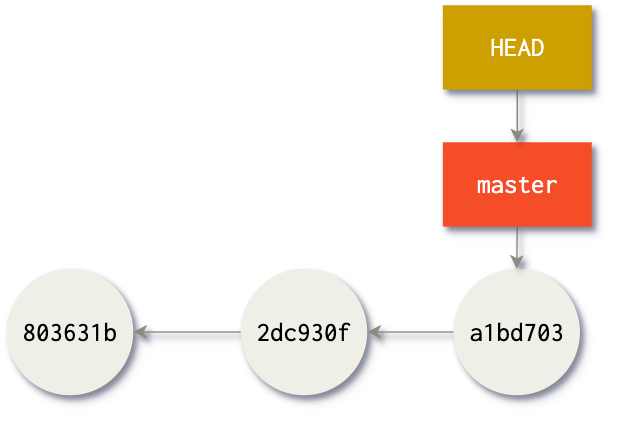
HEAD pointer
Creating and Switching Branches
Using VSCode
In VSCode: Branch → Create Branch → [type branch name]
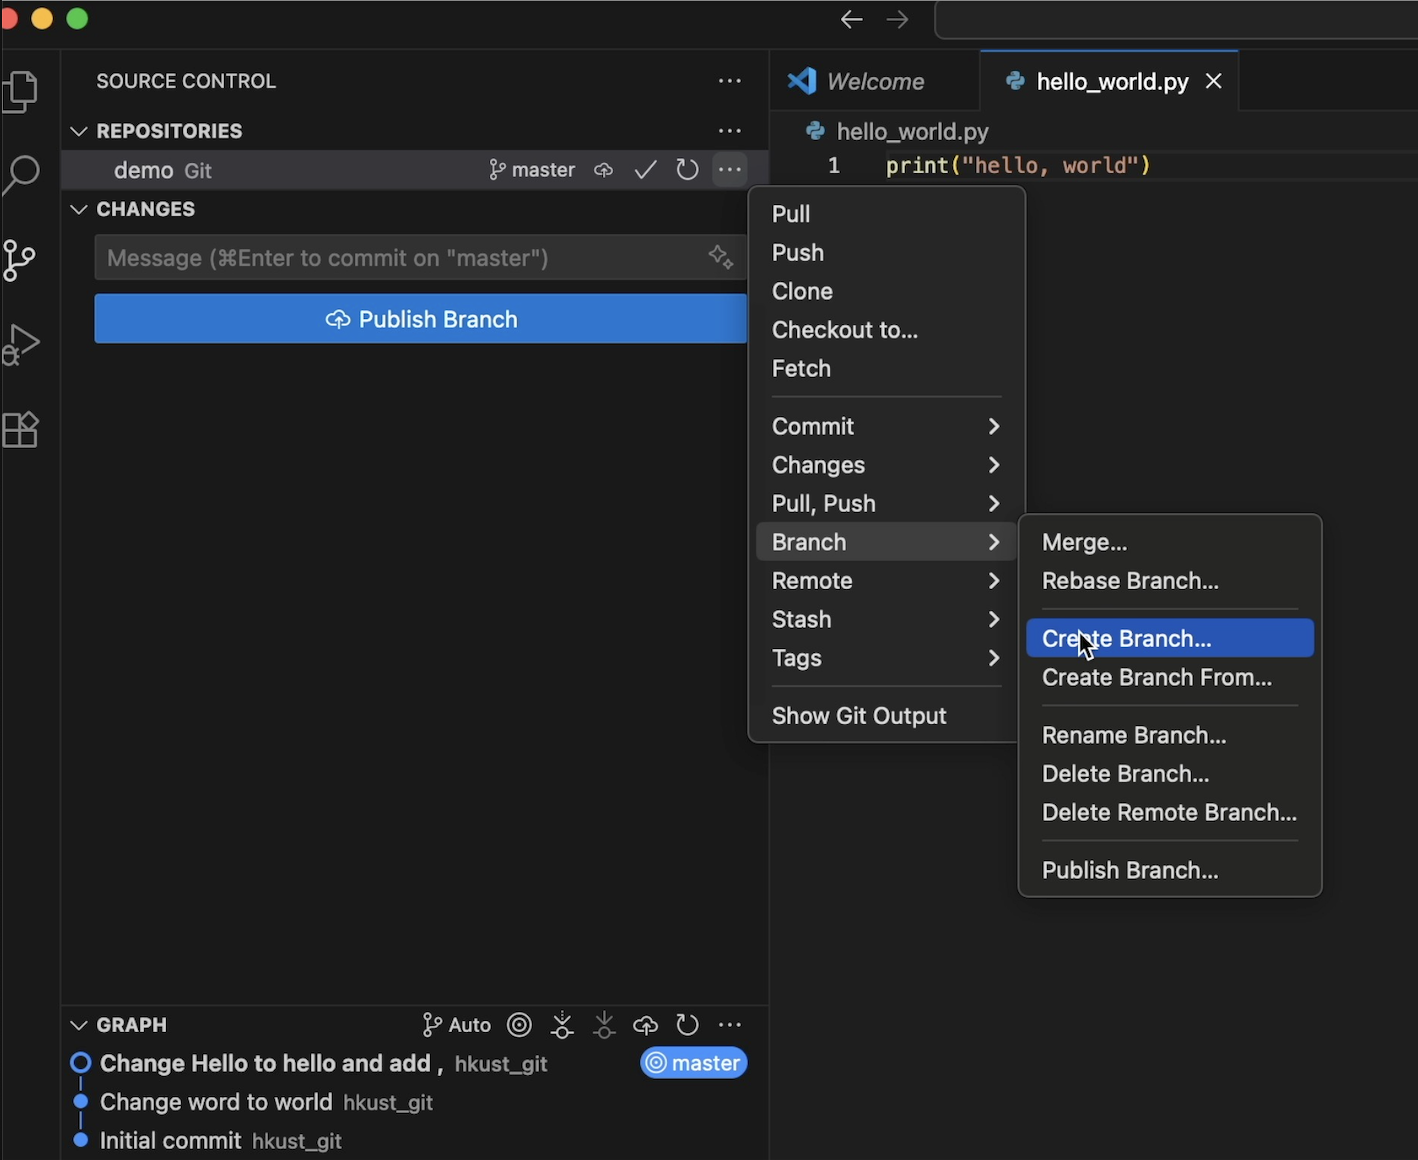
feature in VSCode
Using terminal
git branch feature   # create new branch
git checkout feature # switch to feature branch

# Or create and switch in one command
git checkout -b feature
The new branch points to the same commit as HEAD at creation time.
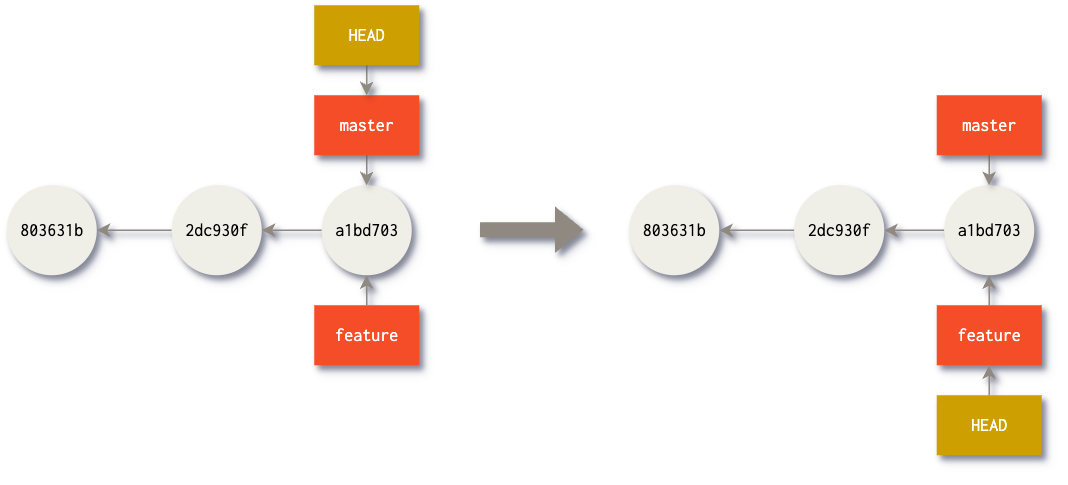
HEAD
After a commit on feature, the feature pointer moves while
master/main stays where it was.
feature branch in VSCode
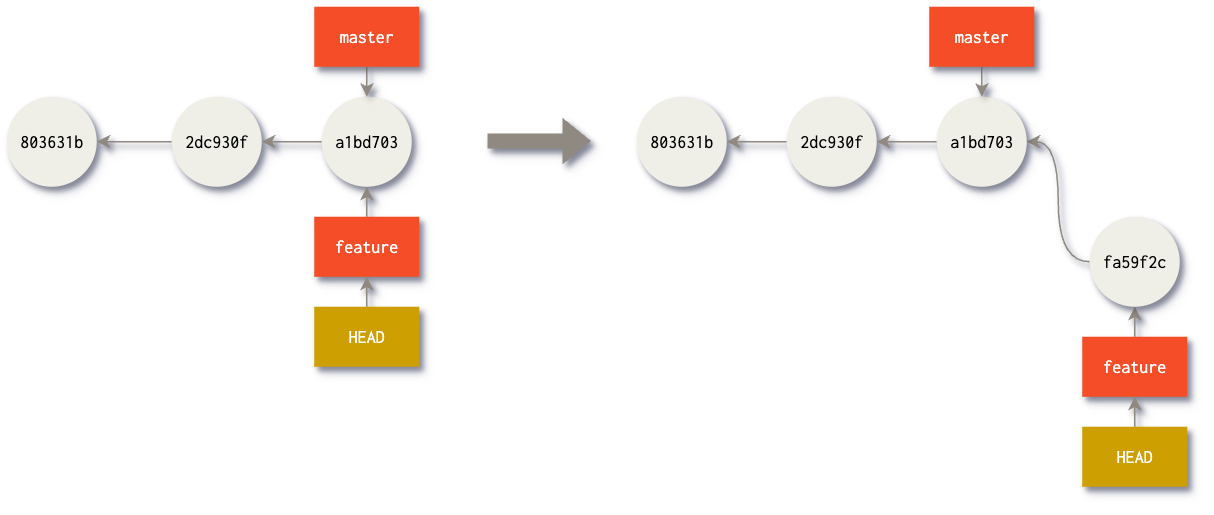
feature moved; master/main unchanged
Switching Between Branches
Using VSCode
- Branch → Checkout to
- Select the branch you want to switch to
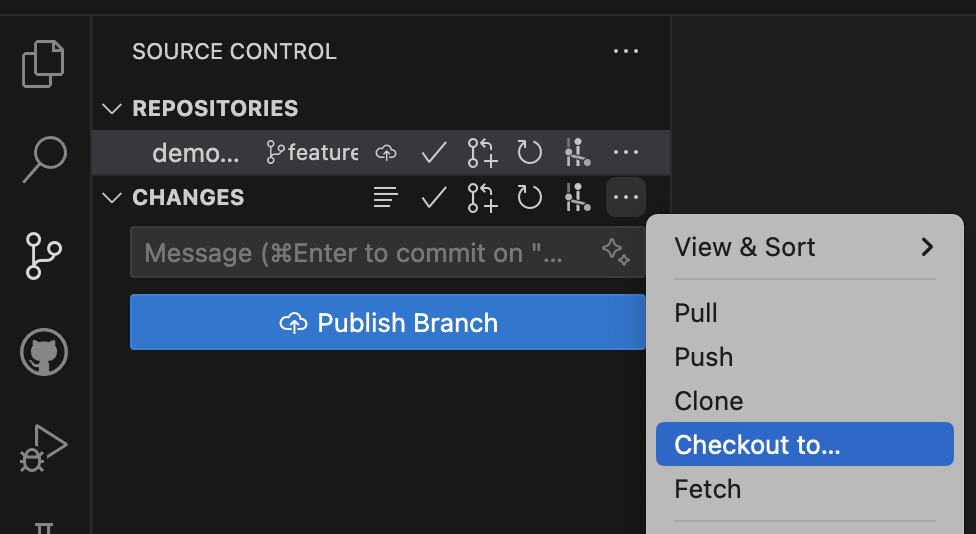
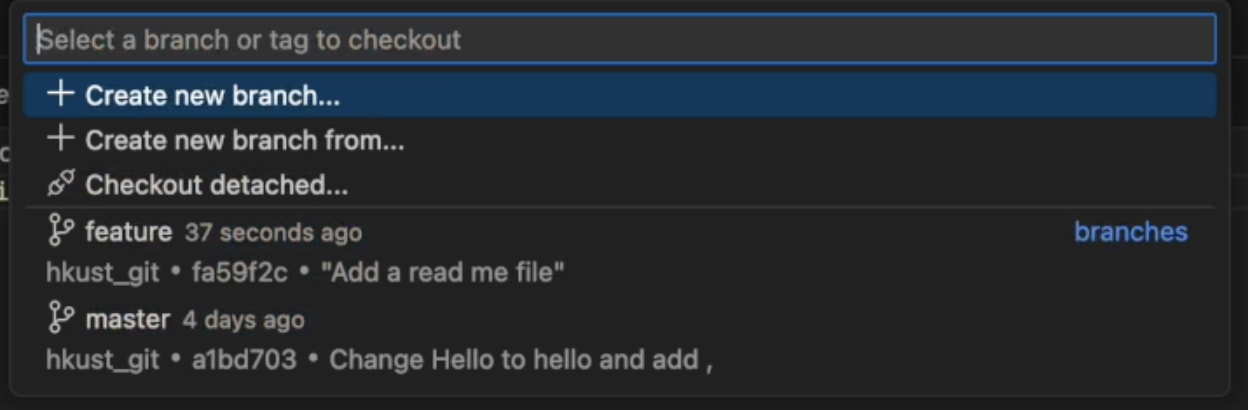
feature to master in VSCode
Using terminal
git checkout main
# or, if your default branch name is master
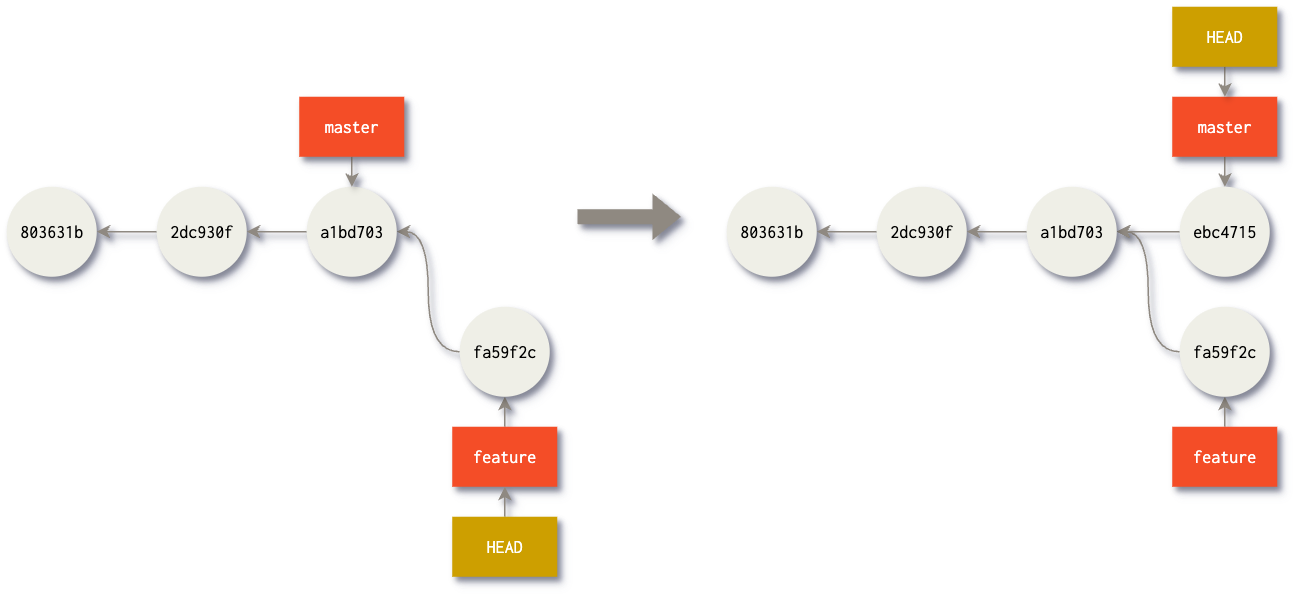
git checkout masterBranch Divergence
If you commit on different branches, history diverges into parallel lines.
For example, commit on master/main while
feature stays unchanged.
master branch in VSCode
Merge Branch
When feature work is finished, merge it back into your target branch.
Using VSCode
- Checkout to the branch you want to merge into (for example,
master) - Branch → Merge
- Select the branch you want to merge from
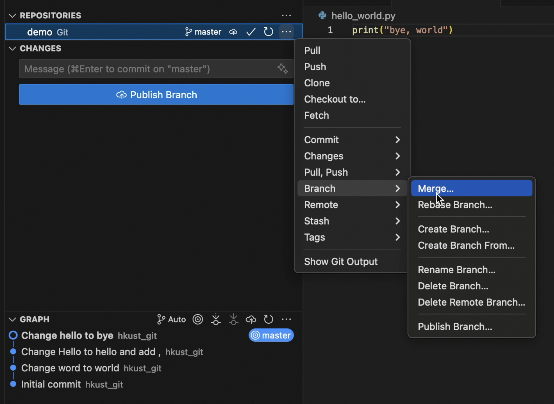

feature into master
Using terminal
git checkout master # target branch
git merge feature   # source branch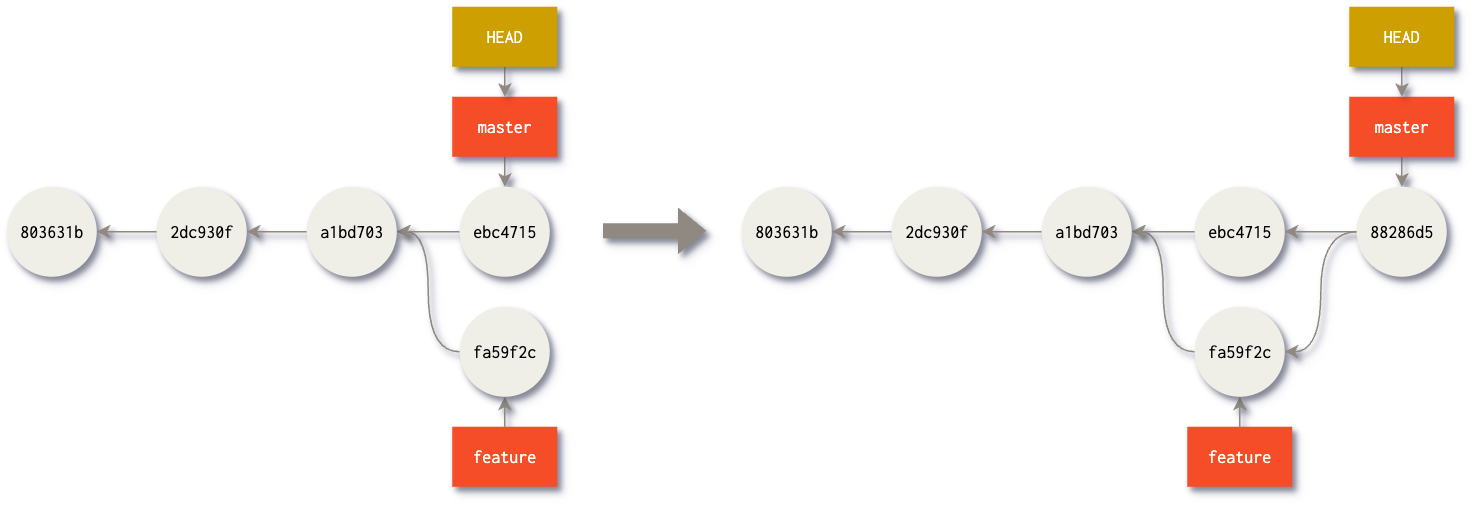
feature into master
If you want to learn how to solve merge conflicts after merging branches, you can learn from here.
Remote Repository and GitHub
Remote repositories are versions of your project hosted on the internet for collaboration and backup.
Remote Repository
Remote branches are denoted as:
<remote-name>/<branch-name>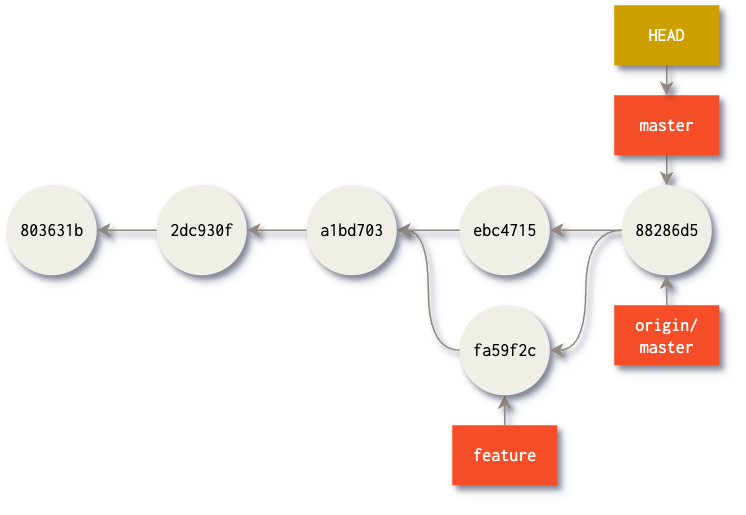
The default remote name is usually origin.
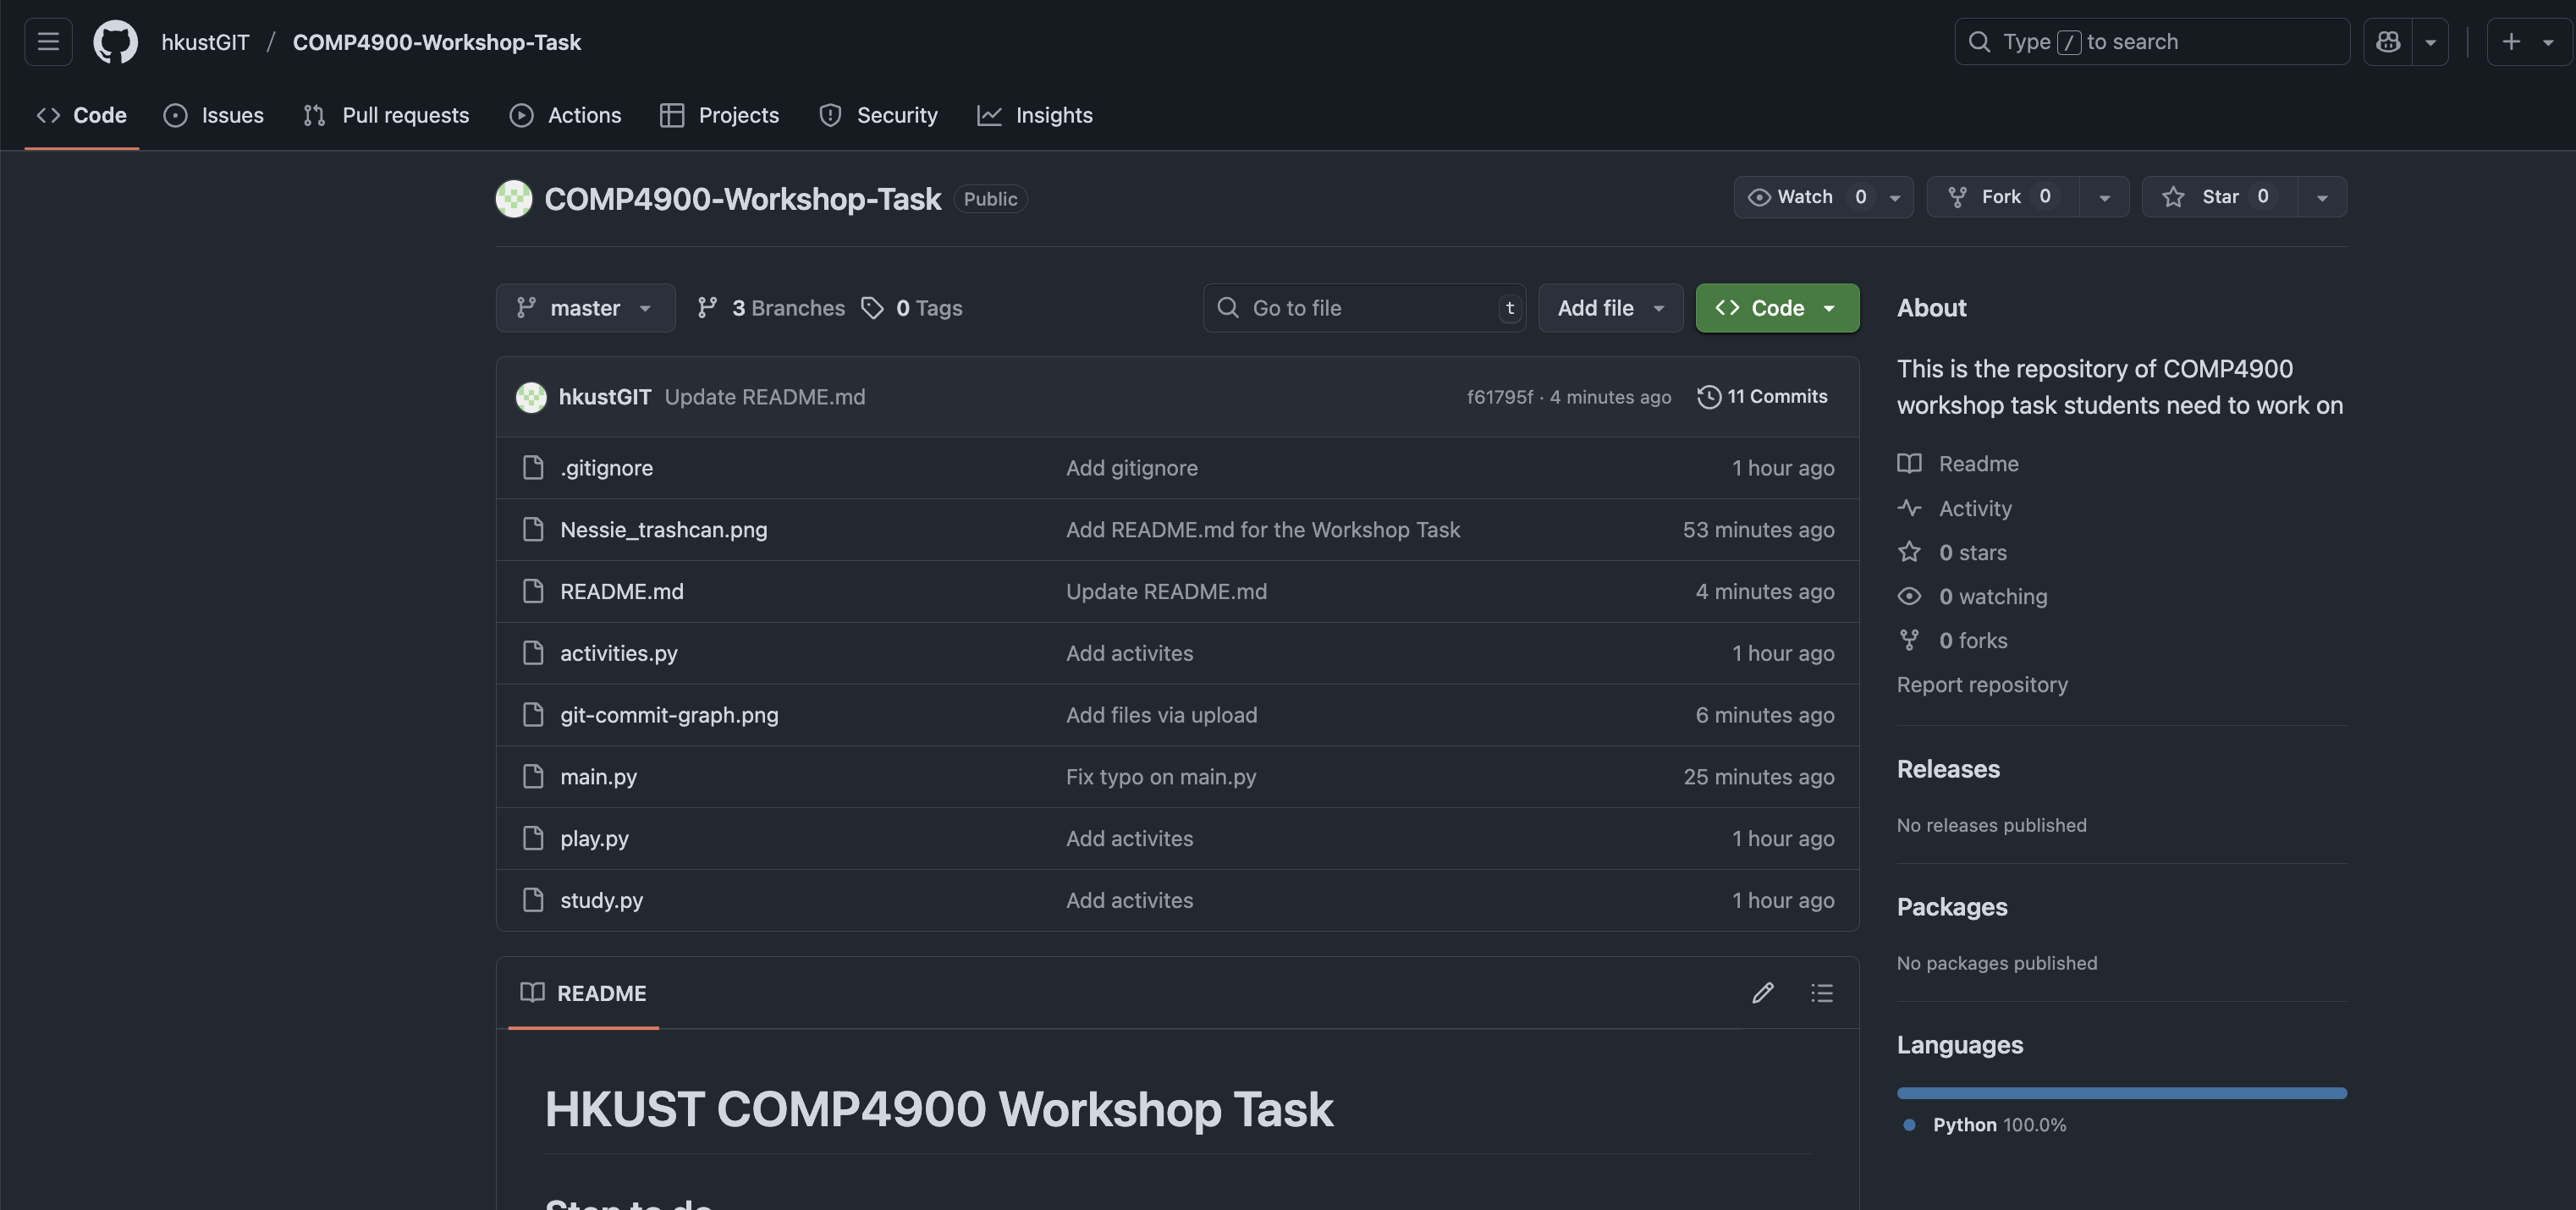
GitHub Setup
We will use GitHub to host our remote repository.
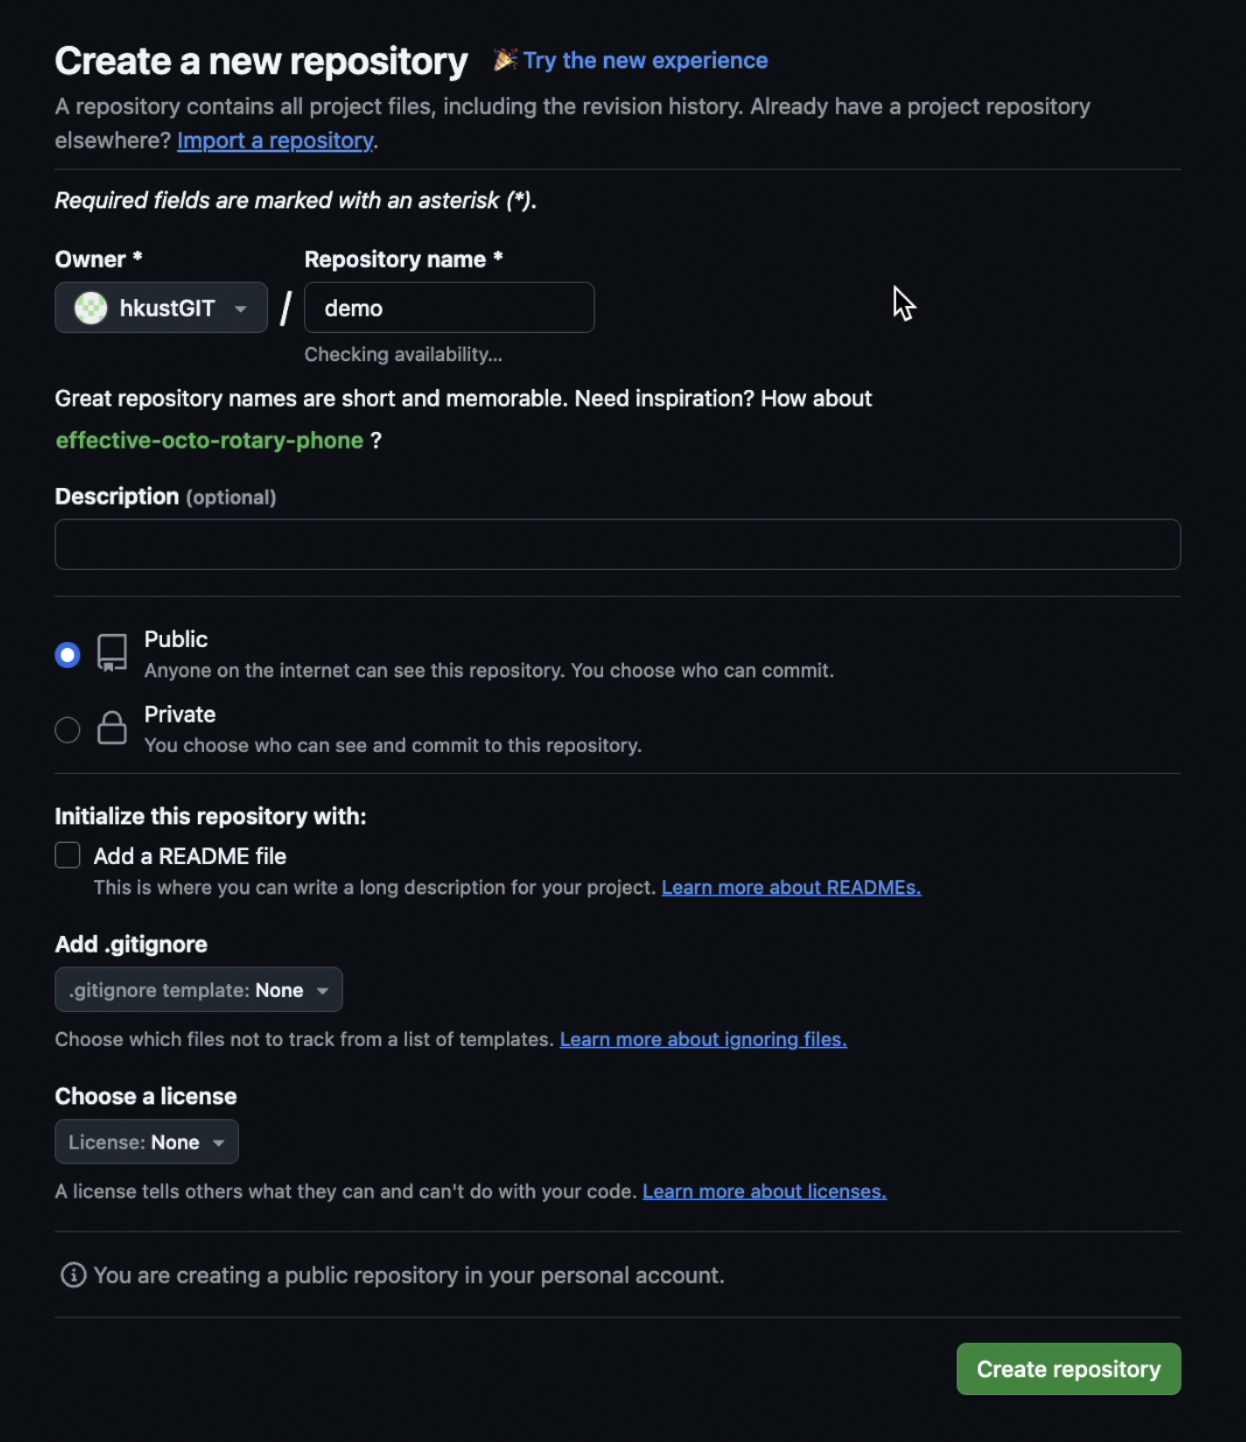
First, create a repository on GitHub.
Remember: Don't click anything on "initialize repository".
- Open GitHub and click New repository.
- Choose repository name (for example:
my-first-repo). - Choose visibility (Public or Private), then create the repository.
Good Practice
Make your repository private for assignment work.
Then copy the repository link:
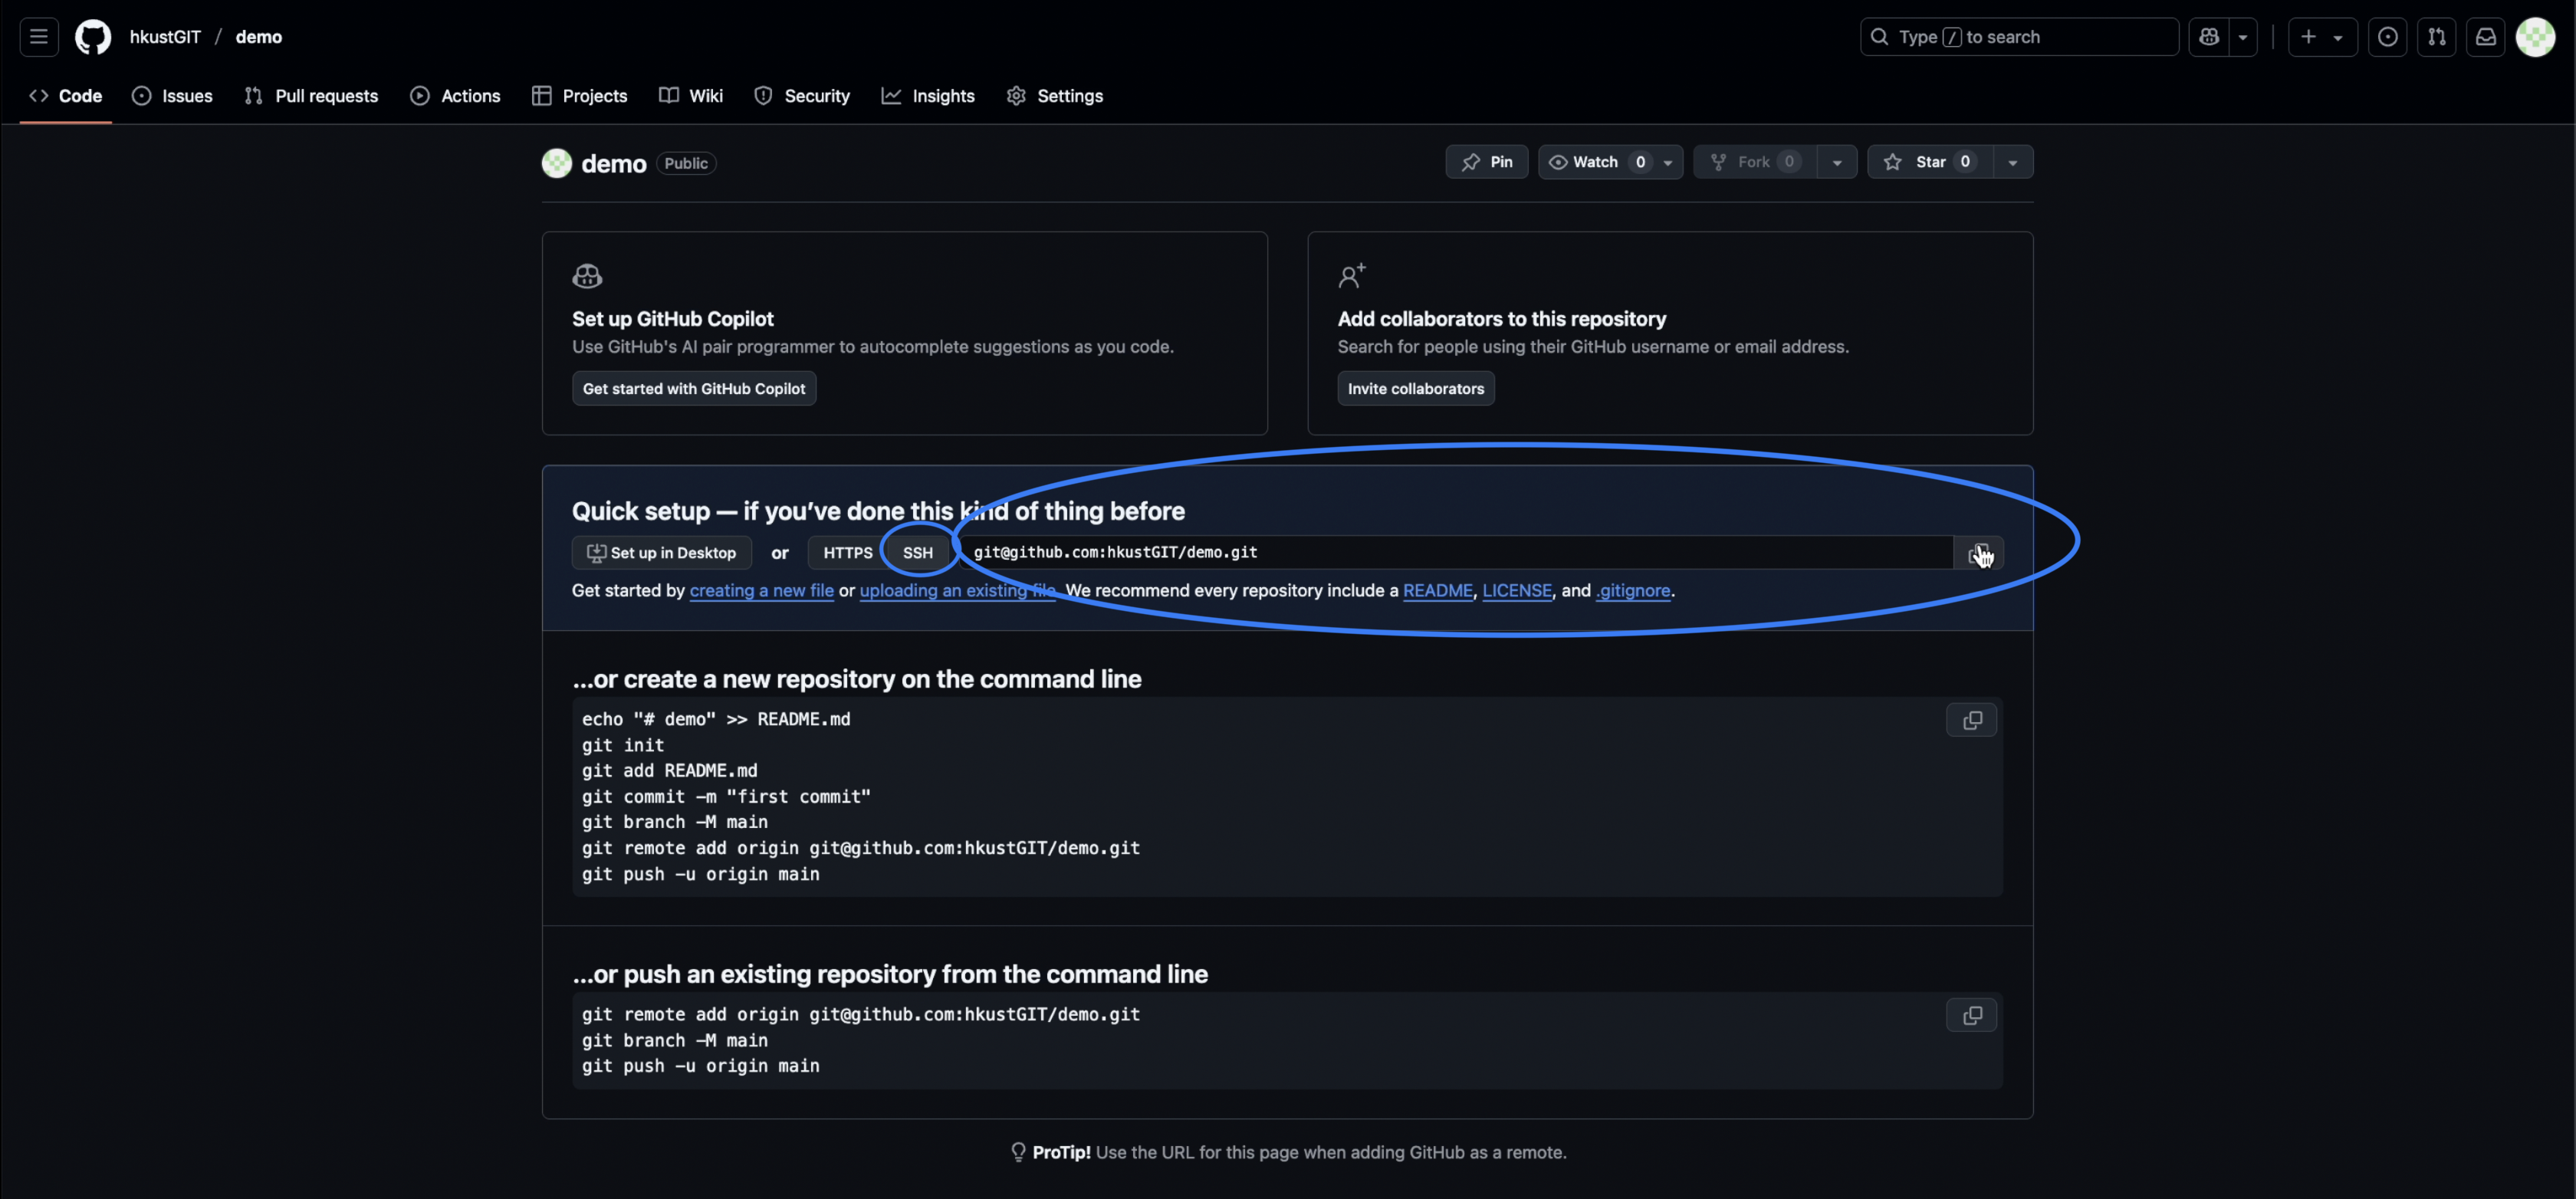
Note
Remember to set up SSH in Git (from the Installation section).
Adding Remote Origins
Using VS Code
In VS Code: Remote → Add Remote
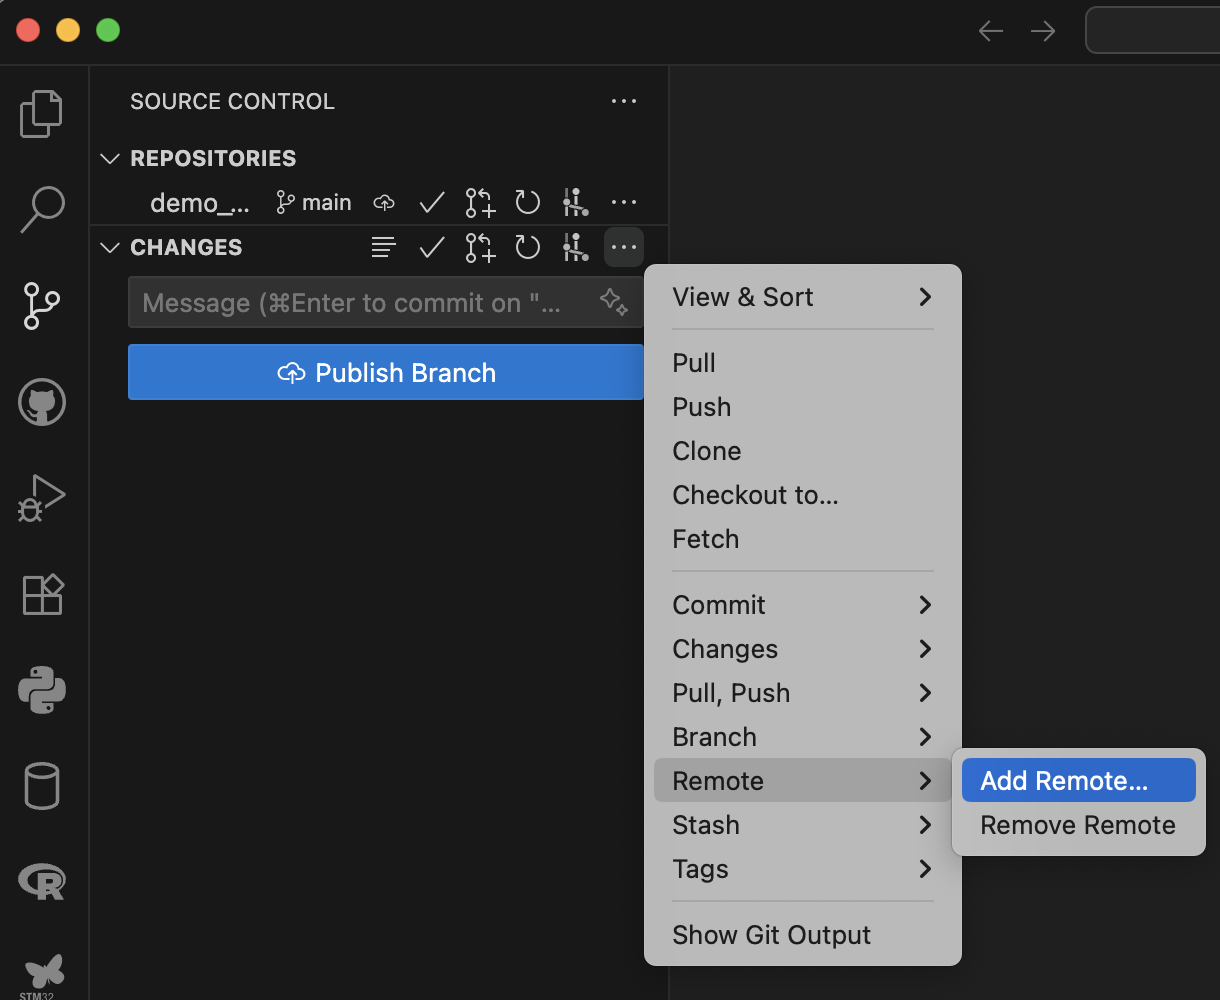
Then add the link and press Enter:

Then type remote name (origin) and press Enter:

origin)
Using terminal
# replace <remote-name> with your remote name
# replace <github-link> with your URL
git remote add <remote-name> <github-link>

# Check remotes
git remote -v
Removing Remote Origins
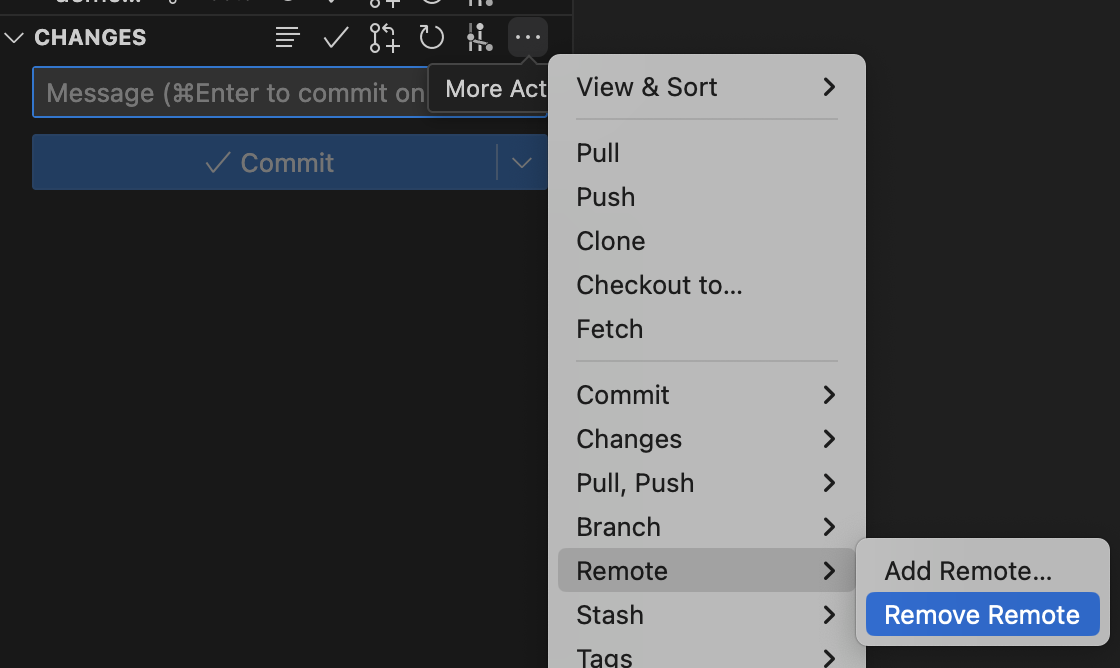
Using VS Code
In VS Code: Remote → Remove Remote
Using terminal
# replace <remote-name> with your remote name
git remote remove <remote-name>
Push Your Work
After setting up remote, push your branch to repository.
Using VS Code
In VS Code: Publish Branch

Using terminal
# replace <remote-name> with your remote name
# replace <branch-name> with your branch name
# you don't need --set-upstream on later pushes
git push --set-upstream <remote-name> <branch-name>

# Later push only
git push
Sync from Repository
When there is a new change on remote branch (for example, editing
hello_world.py on GitHub), sync it to local.
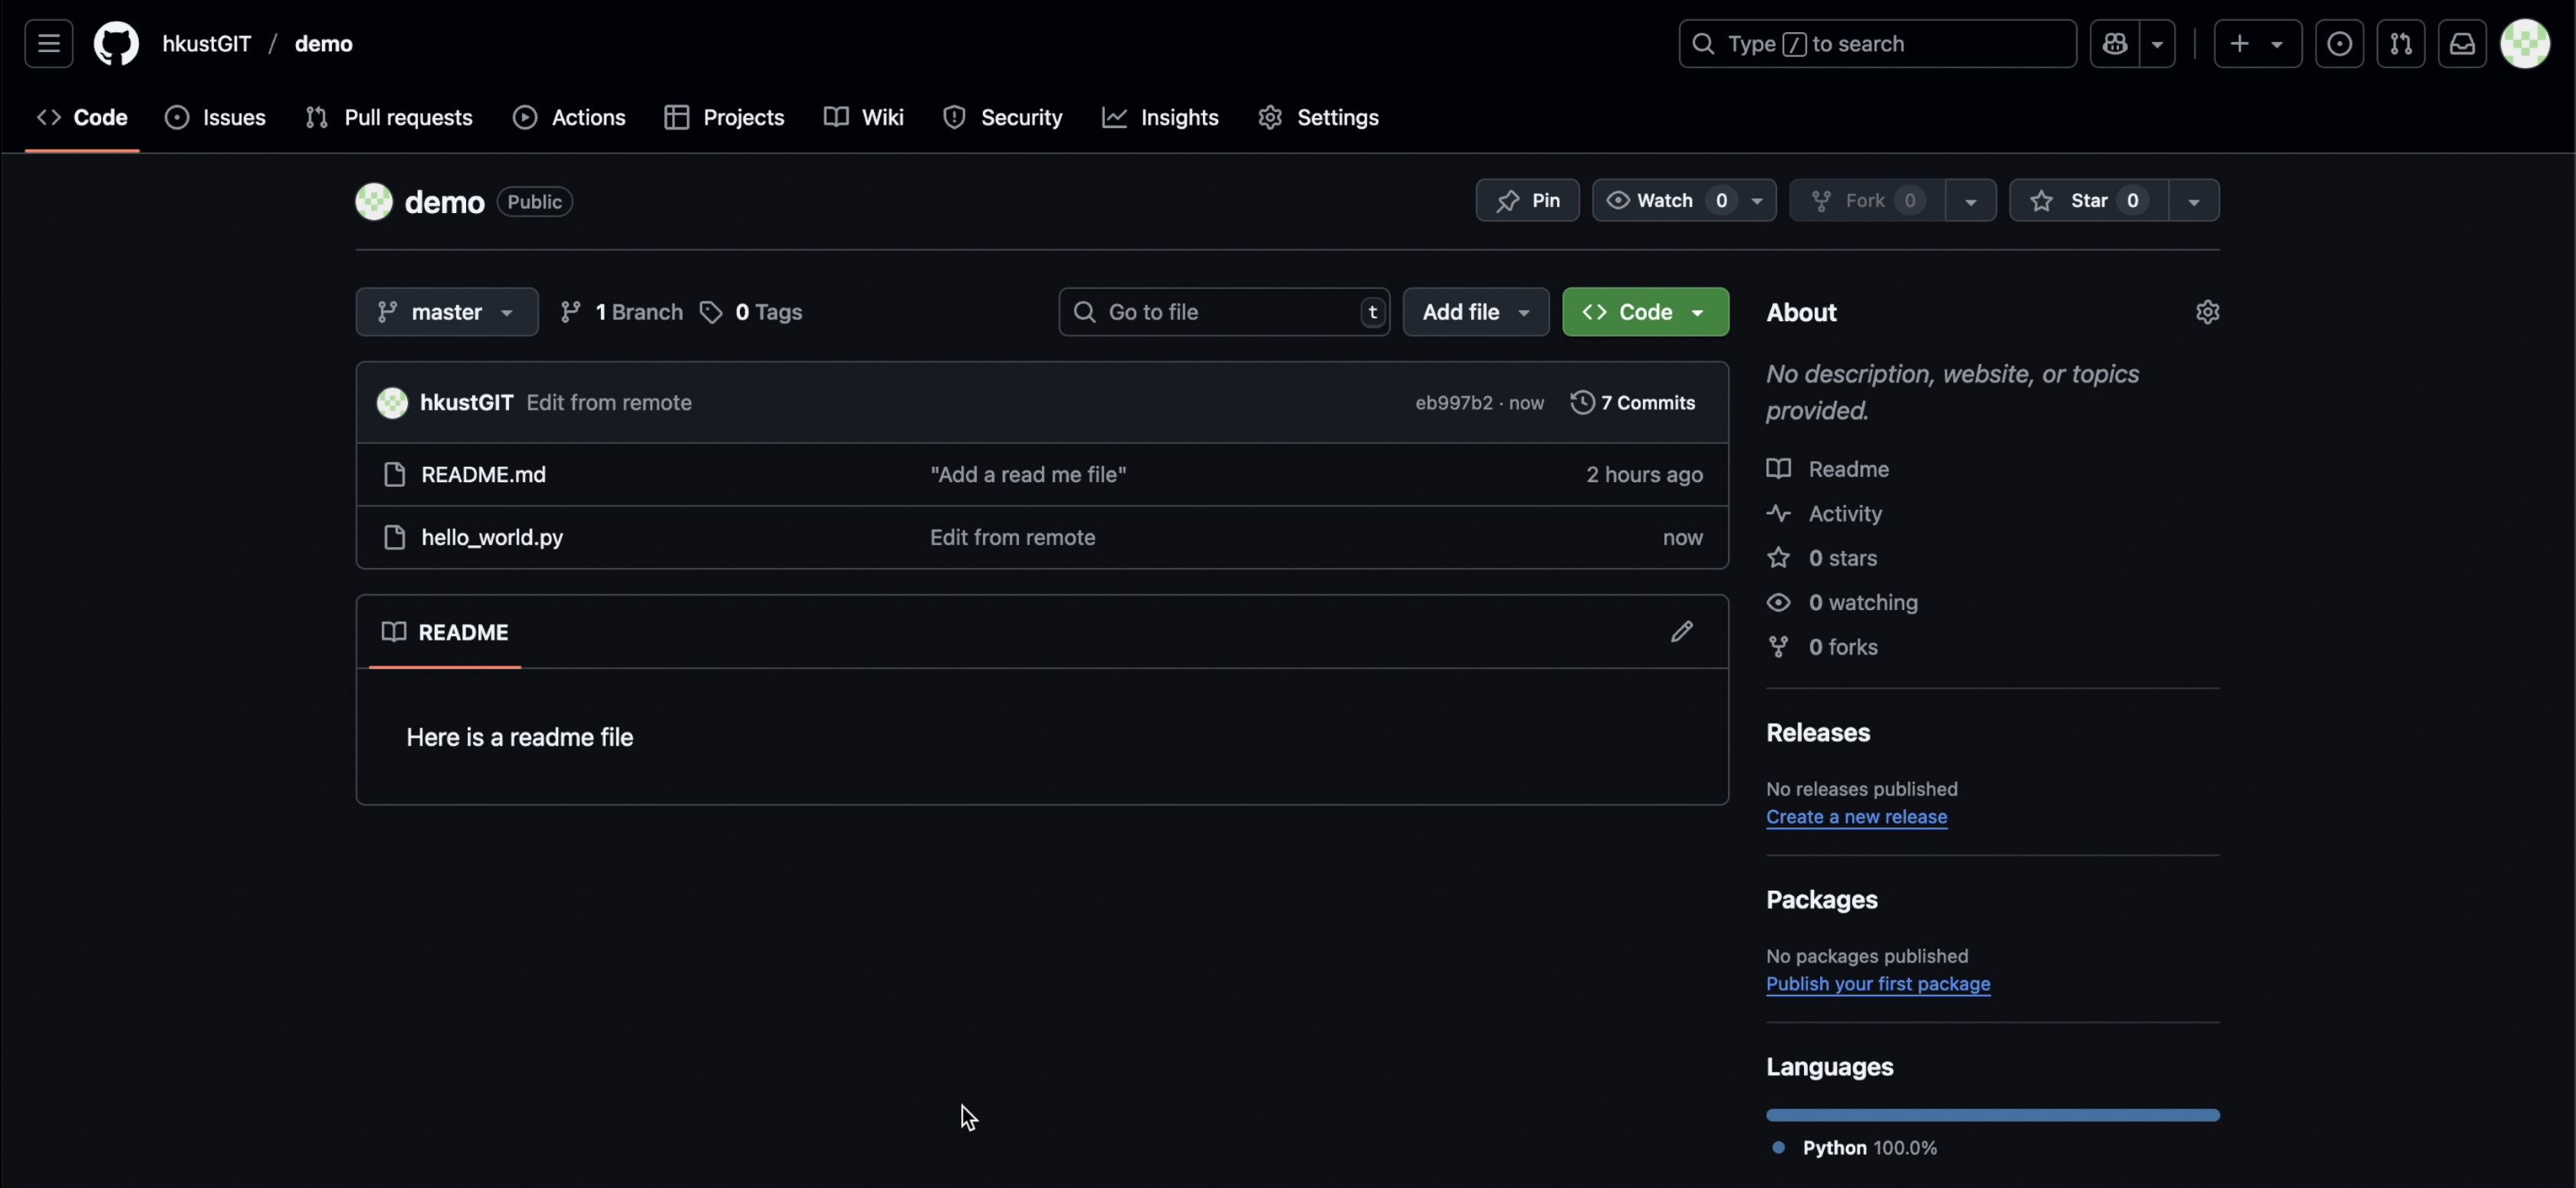
Use fetch to download remote updates:
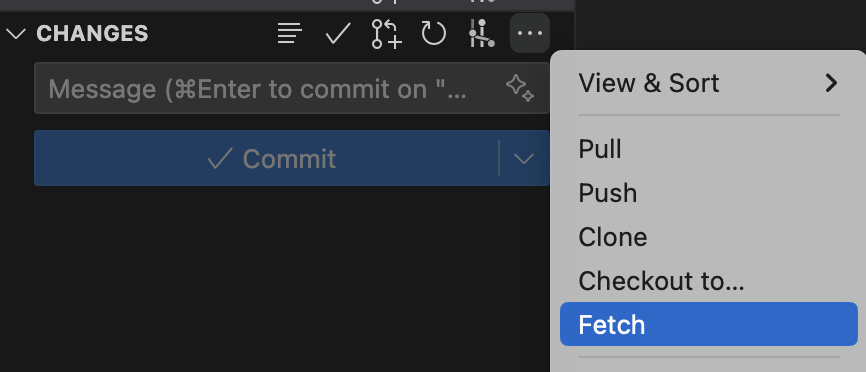
Using terminal
# replace <remote-name> with your remote name
git fetch <remote-name>
This downloads the updated remote branch:
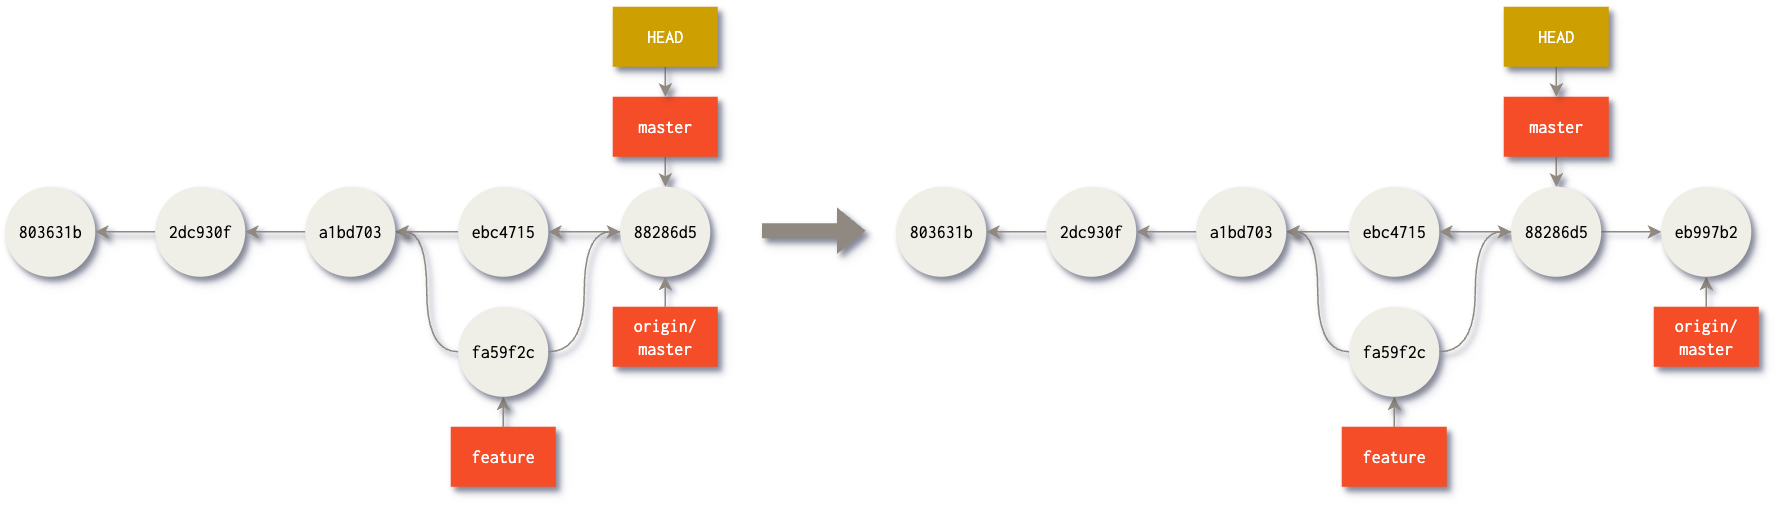
Then you can sync (merge) origin/master to master:
origin/master to master
Note
You can also use merge from <remote-name>/<branch-name> to
<branch-name>; it does the same sync effect.
Using terminal
git merge <remote-name>/<branch-name> <branch-name>Pull (Fetch + Merge)
Or simply use pull, which combines fetch and merge:
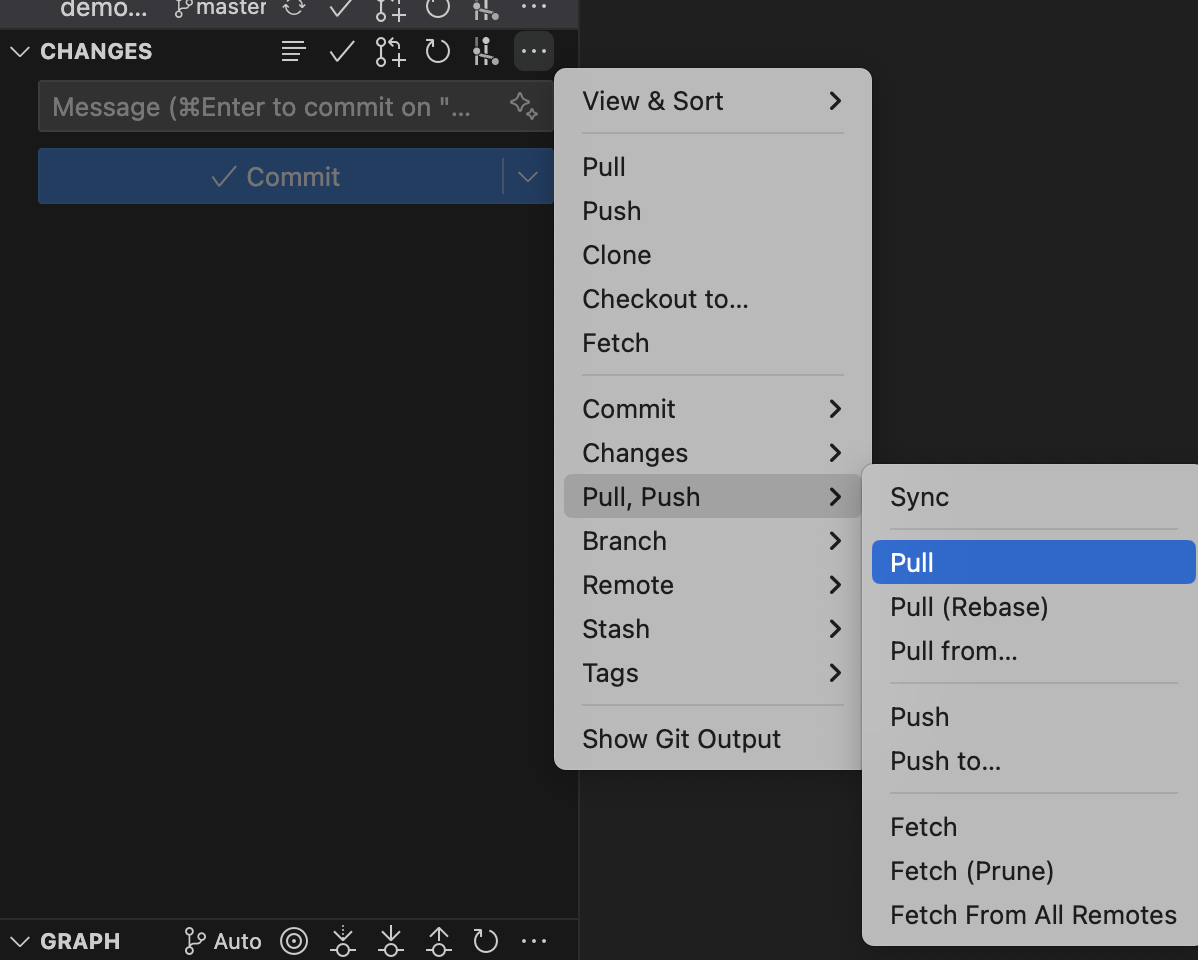
Using terminal
git pull <remote-name>

# This does fetch and merge together
Git Clone
First, get the clone URL from GitHub:
Using VS Code
Press Command+Shift+P and run Git Clone.

Then paste repository URL:

And select destination folder:
Using terminal
# change <remote-url> to target repository URL
git clone <remote-url>
Fork on GitHub
A fork creates your own copy of someone else's repository under your GitHub account.
Why use fork instead of clone?
- Use clone when you already have write access to the original repository.
- Use fork when you do not have write access, such as open-source contributions or class demos.
- Fork lets you push safely to your own repository without affecting the original project directly.
- You can submit changes back with a Pull Request from your fork to the original repository.
Fork steps on GitHub
- Open the original repository and click the Fork button.
- Choose your account as owner, then click Create fork.
- After fork is created, clone your forked repository like a normal repository.
Pull Request Workflow
A Pull Request (PR) lets you propose your changes, discuss them with reviewers, and merge safely into the target branch after approval.
- Open the original repository and click the Pull requests tab.
- Click New pull request.
- Select base repository/branch and your fork branch, then write title and description.
- Click Create pull request.
Pull Request checklist: clear title, concise description, testing notes, and reviewer-friendly commits. After opening the pull request, wait for reviewers to do code review. Once it is approved, a maintainer (or authorized teammate) will merge the pull request.
Collaboration Tip
Always fetch/pull before starting new work to ensure you have the latest changes from collaborators.
Workshop Task
Task Overview
Complete the following workshop tasks in sequence and keep evidence for submission:
Task Instructions
- Create a new repository on GitHub, clone it locally, and push a simple "Hello World" file.
- Create a branch named
feature-greeting, modify the file, commit, and merge back tomain. - Collaborate with a classmate by forking their repository, making one improvement, and opening a pull request.
- (Optional advanced) Try GitHub Issues/Projects or set up a simple GitHub Actions workflow.
Verification
Verify that your repository has clear commit history, working branches, and synchronized remote updates.
Troubleshooting
If push/pull fails, check git remote -v, branch name, and authentication (SSH key setup).
Additional Resources
Essential Commands Summary
Repository Setup
git init
git clone <url>
git remote add origin <url>
Basic Workflow
git status
git add <file>
git commit -m "message"
git push
git pull
Branching
git branch
git checkout -b <branch>
git merge <branch>
git branch -d <branch>
Remote Operations
git fetch
git pull
git push
git remote -v
Official Documentation
- GitHub Docs - Complete GitHub documentation
- Git Documentation - Official Git documentation
- Pro Git Book - Free online Git reference
- Tutorial source materials
Quick Reference
Other git operation
How to Resolve a Merge Conflict
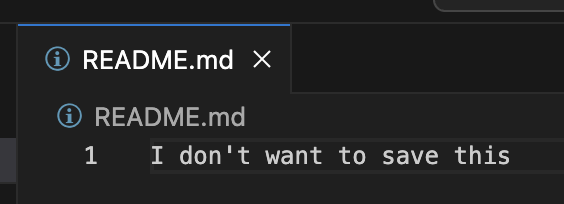
Merge conflicts happen when two branches change the same lines differently. A common case is editing the
same file in both master/main and a feature branch.
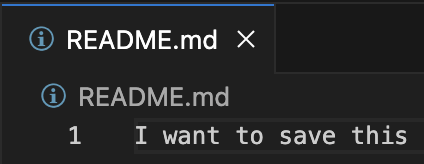
master branch content
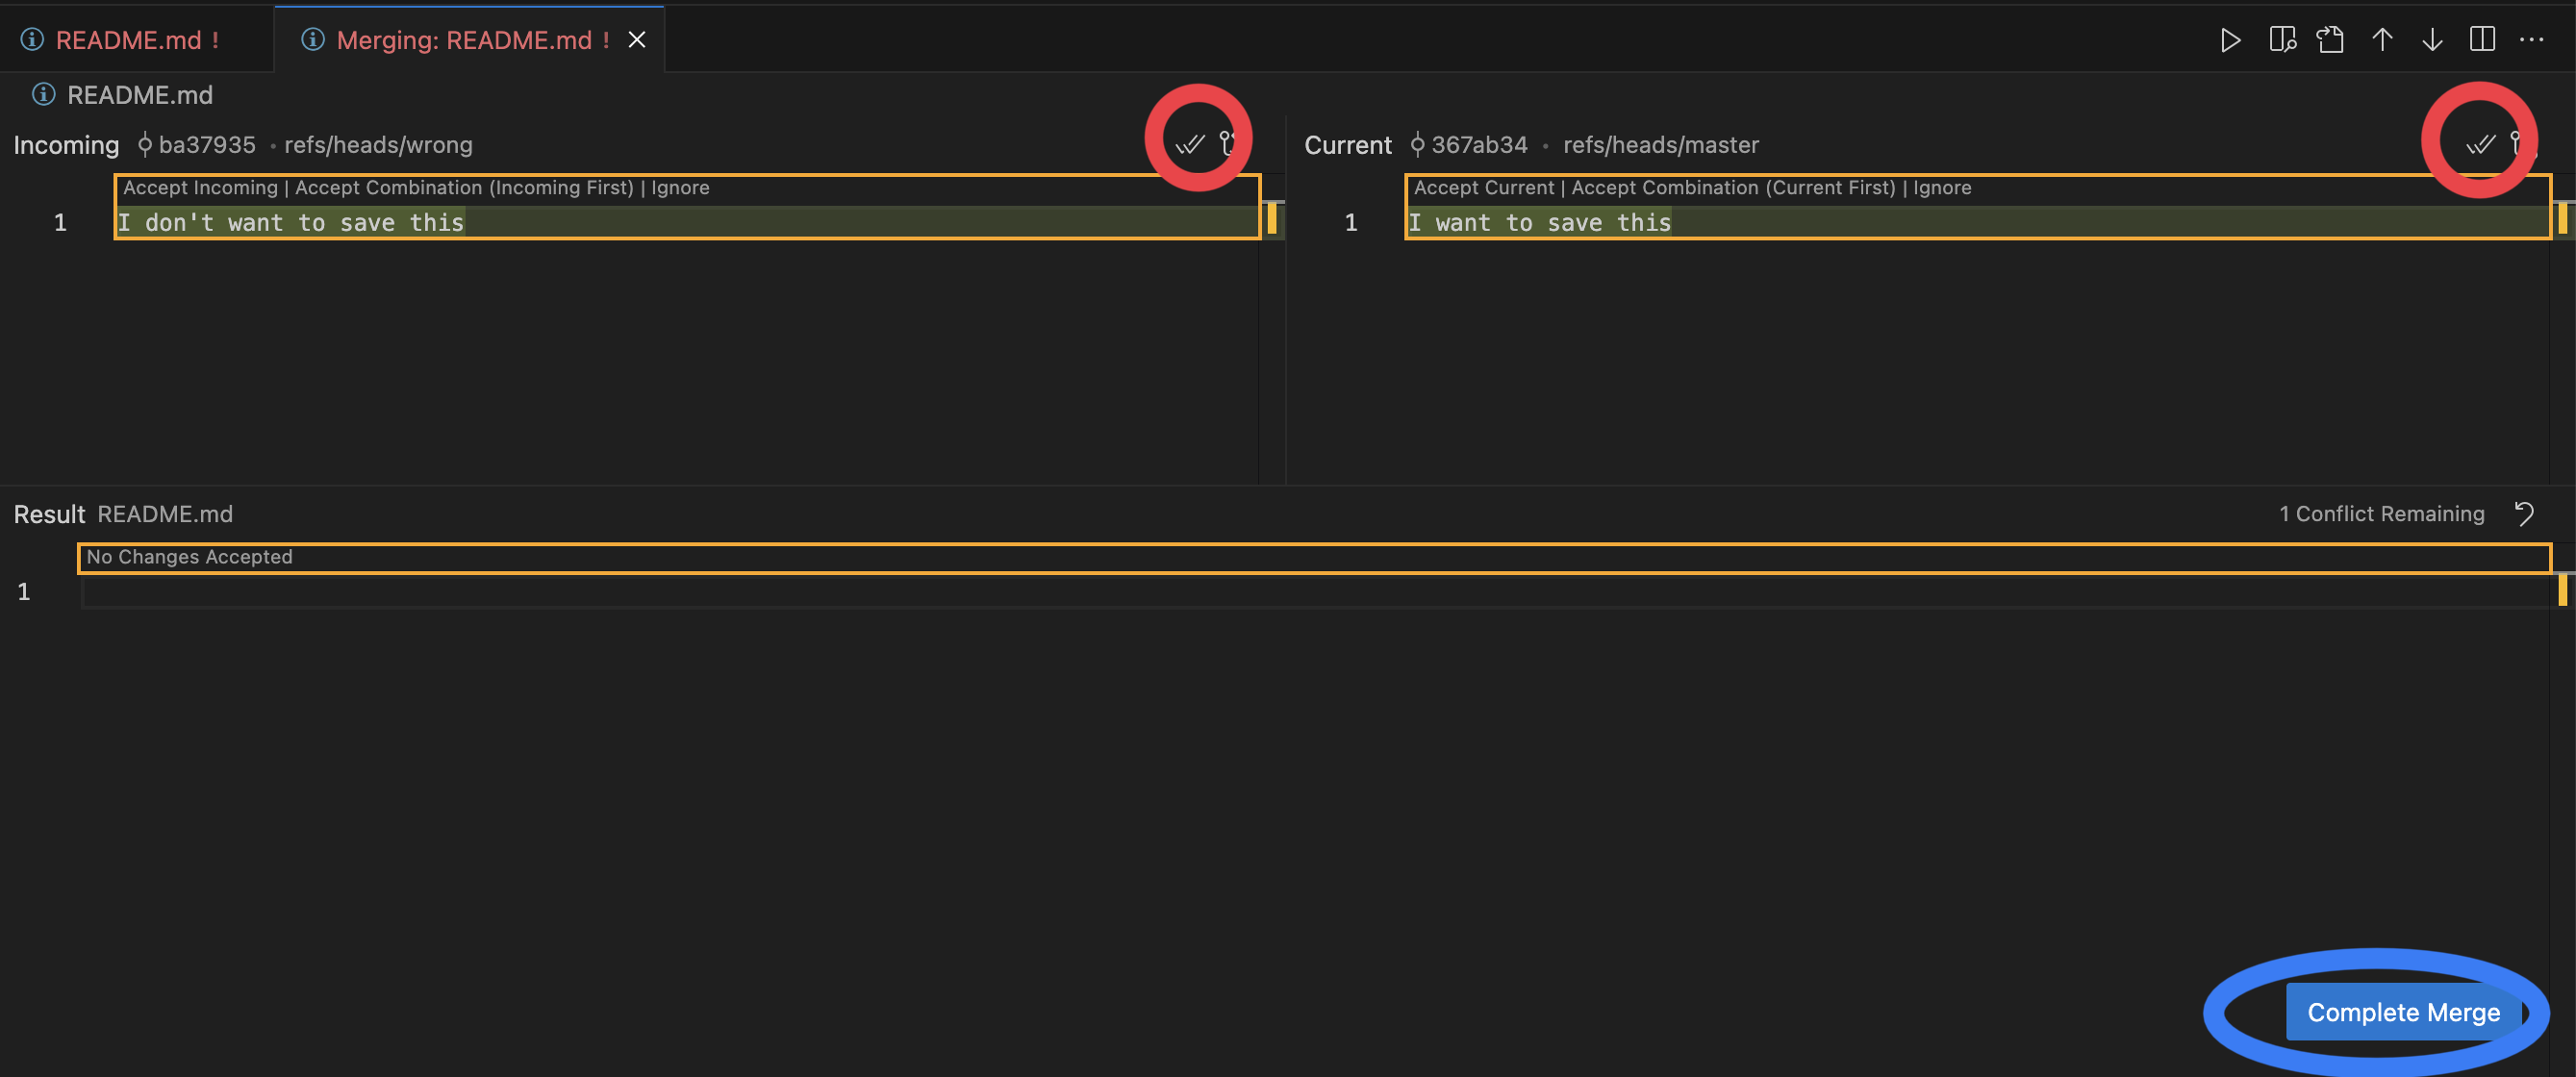
When you merge branches with conflicting edits, Git stops and asks you to resolve:
git checkout master
git merge wrong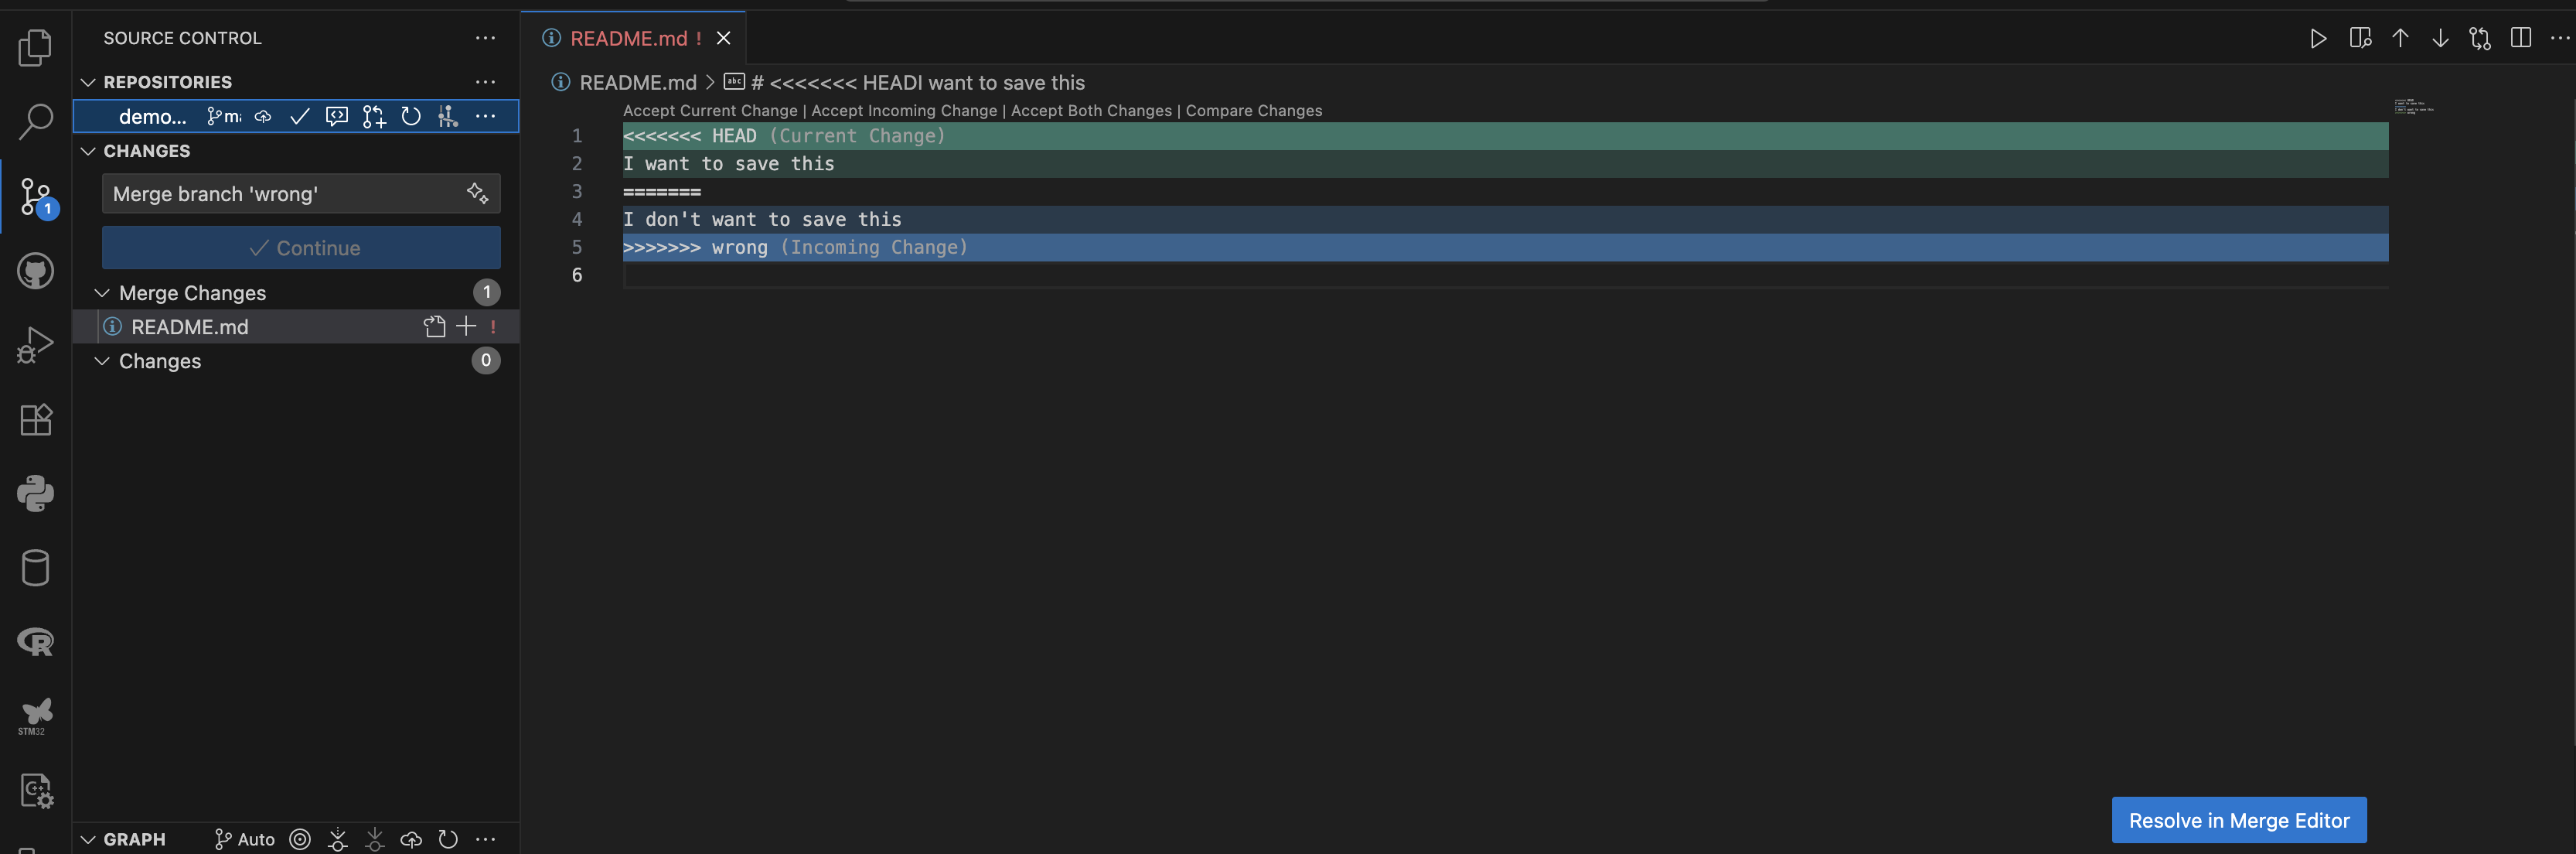
Open the conflicted file and choose the final content in the Merge Editor. You can accept current,
incoming, or both changes, then click Complete Merge.
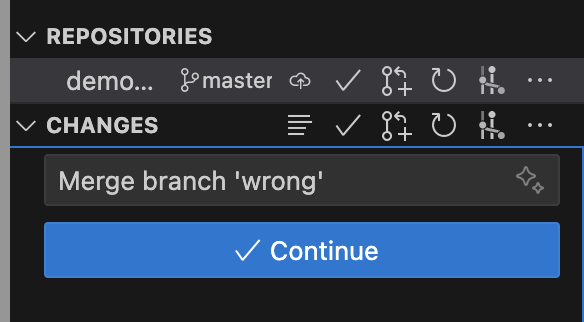
Terminal workflow after editing conflict markers:
# 1) Check conflicted files
git status

# 2) Resolve markers in file: <<<<<<< ======= >>>>>>>
# 3) Stage resolved file(s)
git add <file>

# 4) Complete merge
git commit
If you decide to stop the merge process:
git merge --abortHow to Use Git Revert
Use git revert to safely undo changes from an earlier commit. Unlike git reset,
it does not rewrite history; it creates a new commit that reverses the target changes.
# 1) Inspect history and copy target commit hash
git log --oneline

# 2) Revert one commit by hash
git revert <commit-hash>

# 3) Revert the latest commit
git revert HEAD

# 4) Revert a merge commit (choose mainline parent, usually 1)
git revert -m 1 <merge-commit-hash>
After revert, run git status and git log --oneline to verify the new revert
commit, then push as usual.
Want to Learn More?
Submission & Deadline
The training module deadline is to be announced by the instructor.
We will use the online grading system ZINC to grade your lab work.
You are required to upload only the required evidence files to ZINC:
README.md(brief summary of steps completed)git-log.txt(exported commit history)- Screenshots or links requested in the module handout
You may submit multiple times before the deadline; only the last submission will be graded. Make sure your submission clearly demonstrates command usage, branching workflow, and repository organization.
Changelog
No changes have been made.Frequently Asked Questions
How is Git different from GitHub?
Git is the version control tool that runs locally. GitHub is a cloud platform that hosts Git repositories and supports collaboration.
What should I do if I get a merge conflict?
Run git status, open conflicted files, resolve the conflict markers manually, then use
git add and git commit to complete the merge.
My code doesn't work / there is an error, can you debug it for me?
As this module is assessed coursework, we cannot complete tasks for you directly.
We can still provide hints and help you reason about the error messages.